Installing MOTECH for Developers (“Official” Method)
Table of Contents
Installing on Ubuntu
The versions below may change, most likely the latest stable release will work for your purposes. If they do not, please feel free to send in feedback.
- Install Ubuntu Desktop 12.04.2 LTS 64bit
-
Note
64-bit is required for Motech’s installation
Install Maven, Git, Curl, Activemq, and mysql
In terminal, type
sudo apt-get install curl git maven activemq mysql-server
On a fresh Ubuntu installation, you may need to run the following first
sudo apt-get update
Configure ActiveMQ
Run the following
sudo ln -s /etc/activemq/instances-available/main /etc/activemq/instances-enabled/main
Note
For ActiveMQ scheduled delivery to work, you must set the attribute: schedulerSupport=”true” for the broker element in your activemq.xml config file. This file should be located at (active-mq-folder)/conf/activemq.xml.See ActiveMQ docs.
Install JDK 7
Go to The Java JDK Download Page
Accept License Agreement
Click on jdk-7u51-linux-x64.tar.gz (or latest stable version)
Extract the file into your home directory, ie: /home/*<user>*/jdk1.7.0_51
Set the proper Java environment and change maven options:
Start a new terminal session
Edit your .profile file
nano ~/.profile
append the following at the end of the file:
export PATH="$HOME/jdk1.7.0_21/bin:$PATH"
export JAVA_HOME=$HOME/jdk1.7.0_21
export MAVEN_OPTS="-Xmx512m -XX:MaxPermSize=128m"
Save the changes (Ctrl+X) and quit
Confirm the settings are right
Log out & log back in & start a new terminal
Type
java -version && env | grep MAVEN_OPTS
You should see something like:
java version "1.7.0_51"
Java(TM) SE Runtime Environment (build 1.7.0_51-b11)
Java HotSpot(TM) 64-Bit Server VM (build 23.21-b01, mixed mode)
MAVEN_OPTS=-Xmx512m -XX:MaxPermSize=128m
Install Tomcat7
Go to Tomcat’s download page
Under 7.0.52 (or the latest stable version) - Binary Distributions - Core, click on tar.gz
Once downloaded, expand the file to your home directory, i.e.: /home/*<user>*/apache-tomcat-7.0.52
Edit the tomcat-users.xml file (located under \etc\tomcat7\conf\) to add an admin user:
In the terminal type
nano ~/apache-tomcat-7.0.52/conf/tomcat-users.xml
Insert a line similar to the following before the closing </tomcat-users> tag:
<user username="*<username>*" password="*<password>*" roles="manager-gui"/>
Save the changes (Ctrl+X) then quit
Now edit ~/.bashrc to setup tomcat’s environment variable
nano ~/.bashrc
Append the following line:
export CATALINA_HOME=$HOME/apache-tomcat-7.0.52
Save the changes (Ctrl+X) then quit
Start a new terminal session or type
source ~/.bashrc
Install CouchDB
Download the latest stable sources from http://couchdb.apache.org and then follow the instructions in the INSTALL.Unix file.
For Ubuntu 13.10, just run:
sudo apt-get install couchdb
Once this is done, navigate to http://localhost:5984 to verify that the installation completed successfully.
{"couchdb":"Welcome","uuid":"52068def93b82a2653dcf352a4f9273a","version":"1.4.0","vendor":{"version":"1.4.0","name":"The Apache Software Foundation"}}
Install CouchDB-Lucene
Follow these instructions also be sure to follow the proxy handler instructions
Once the proxy has been configured, restart couchdb with:
sudo service couchdb restart
After restarting couchdb, navigate to http://localhost:5984/_fti and you should see something like this:
{"couchdb-lucene":"Welcome","version":"0.10.0-SNAPSHOT"}
Setup MySQL
In your motech source root directory, type in the terminal:
$ mysql -u root -pthen type:
sql> create database motechquartz;
sql> create database motech_data_services;
sql> create user 'quartz'@'localhost' identified by 'quartz2123';
sql> grant all privileges on motechquartz.* to 'quartz'@'localhost';
sql> exit;
then type:
mysql -u root -p motechquartz < modules/scheduler/scheduler/sql/create_db_schema_quartz_v2.1.sql
- Start Tomcat
In terminal, type:
~/apache-tomcat-7.0.52/bin/catalina.sh jpda start
You should see messages similar to:
Using CATALINA_BASE:   /home/*<user>*/apache-tomcat-7.0.52
Using CATALINA_HOME:   /home/*<user>*/apache-tomcat-7.0.52
Using CATALINA_TMPDIR: /home/*<user>*/apache-tomcat-7.0.52/temp
Using JRE_HOME:        /home/*<user>*/jdk1.7.0_51
Using CLASSPATH:       /home/*<user>*/apache-tomcat-7.0.52/bin/bootstrap.jar:/home/*<user>*/...
You can also confirm tomcat was started by going to http://localhost:8080 in a browser
Jump to the Building and Installing MOTECH section to install MOTECH
Installing on a Macintosh
Installing Prerequisites for MOTECH
Installing HomeBrew
To install Homebrew, run the following in the terminal
ruby -e "$(curl -fsSL https://raw.github.com/Homebrew/homebrew/go/install)"- Use Homebrew to install git, erlang, ActiveMQ, and Apache Tomcat:
brew install git
brew install activemq
brew install tomcat
brew install maven
Homebrew installations are located in /usr/local/Cellar` with symlinks in ``/usr/local/bin, which should already be part of your $PATH environment variable.
Note
Homebrew provides instructions about how to run these applications, as well as how to have launchd start them automatically on system startup.
Configuring Tomcat:
Edit the tomcat-users.xml file to add an admin user. Insert a line similar to the following before the closing </tomcat-users> tag:
<user username="motech" password="motech" roles="manager-gui"/>
Installing JDK 7:
Mac OS includes JDK6 by default, however JDK 7 is required for MOTECH. Use these instructions to install the latest version of the JDK.
Installing MySQL:
Before installing MySQL, you will need Xcode from the App Store. This can take a while; it’s a big download.
Next start Xcode from the Launchpad (rocketship icon in the dock) and select Install. Then you can quit Xcode; you don’t need to keep it running.
Note
(Command Line Tools using Xcode are included in OS X Mavericks, but not previous OS versions. If you are running Mountain Lion, you can follow these instructions: http://blog.mclaughlinsoftware.com/2012/12/10/mountain-lion-pre-mysql/)
Go to http://dev.mysql.com/downloads/mysql/ and download the appropriate DMG archive. Open it, double-click on the installer, and follow directions.
Once mysql has finished installing, double-click the MySQL preferences pane in the DMG and follow instructions. For more details see ‘these instructions’_ .
Note
Homebrew can be used to install MySQL, however Homebrew will not install the Mysql System Preferences control panel.
Setting up Symbolic Link and Environment Variables
Create a symbolic link from the Tomcat directory (Homebrew installs into /usr/local/Cellar/tomcat/<version number>/libexec) to /usr/local/tomcat:
ln -s /usr/local/Cellar/tomcat/`brew info tomcat | grep stable | awk '{print $3}' | sed 's/,//'`/libexec /usr/local/tomcatEdit your ~/.bash_profile to set environment variables (catalina is Tomcat):
export JAVA_HOME="/Library/Java/Home"
export MAVEN_OPTS="-Xmx512m -XX:MaxPermSize=128m"
export CATALINA_HOME="/usr/local/tomcat"
export CATALINA_OPTS="-Xms1024m -Xmx2048m -XX:MaxPermSize=1024m"
export PATH=/usr/local/mysql/bin:$PATH
- When you’re done editing:
source ~/.bash_profile
Jump to the Building and Installing MOTECH section to install MOTECH
Building and Installing MOTECH
Getting the MOTECH code
Building MOTECH
Assuming you issued the git clone command in your home directory root, in the terminal
$ cd ~/motech
$ mvn install
b.) It takes some time to build MOTECH, but eventually you should see:
[INFO] ------------------------------------------------------------------------
[INFO] BUILD SUCCESS
[INFO] ------------------------------------------------------------------------
[INFO] Total time: 29:19.284s
[INFO] Finished at: Fri Jun 07 12:12:43 PDT 2013
[INFO] Final Memory: 152M/378M
[INFO] ------------------------------------------------------------------------
Note
Should you get a java.lang.OutOfMemoryError exception, it may be because you forgot to set MAVEN_OPT as described in [3.5]. But you may need to increase -Xmx. So something like -Xmx1024m might work.
Install MOTECH
In a browser, go to http://localhost:8080
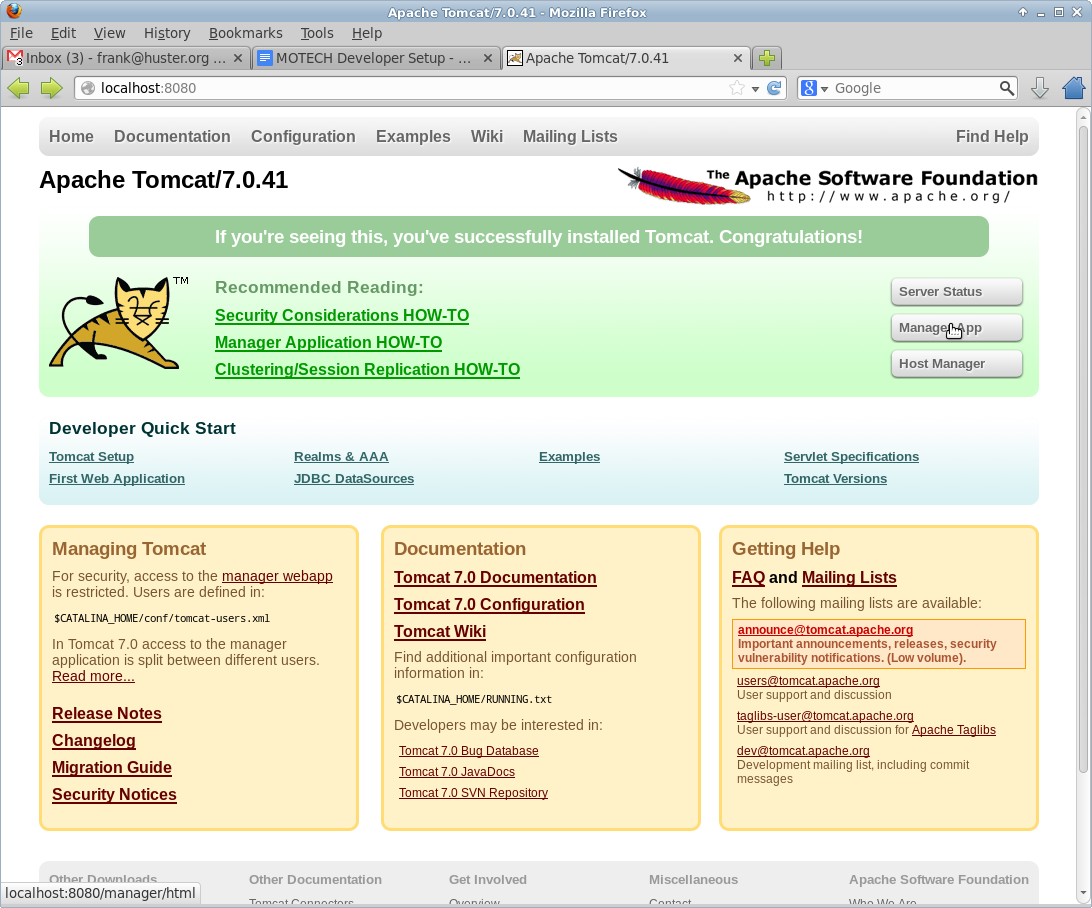
Click on Manager App
Type the user/password you used in tomcat-users.xml
temporary hack you need to remove ~/.motech/config/motech-settings.conf to allow the create initial user wizard.
In the Tomcat Web Application Manager, scroll down to the Deploy section and the WAR file to deploy subsection, click on Browseand select or navigate to ~/motech/platform/server/target/motech-platform-server.war then click on Deploy

Depending on your machine it could take a while for motech-platform-server to deploy
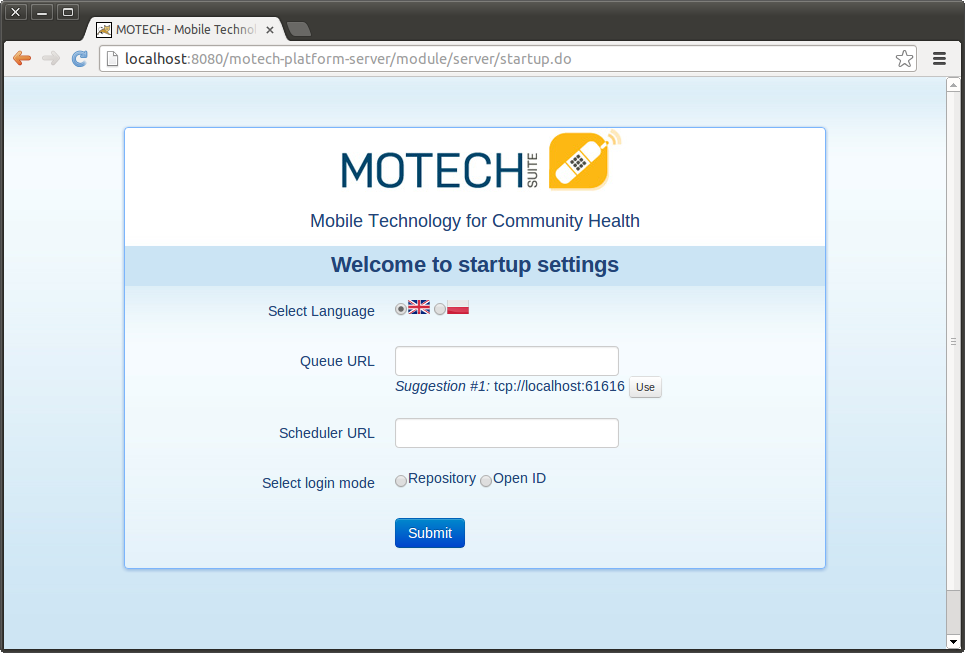
In the Tomcat Web Application Manager page, click on /motech-platform-server, you get the MOTECH initial user screen
Installing the IDE, Intellij IDEA Community Edition & open MOTECH project
Go to the Jetbrains home page and click on Download Now in the Community Edition box, then expand the file to your home directory.
From a terminal, assuming you extracted IntelliJ to ~/idea-IC-129.713, start IntelliJ
$ ~/idea-IC-129.713/bin/idea.shSelect Import Project
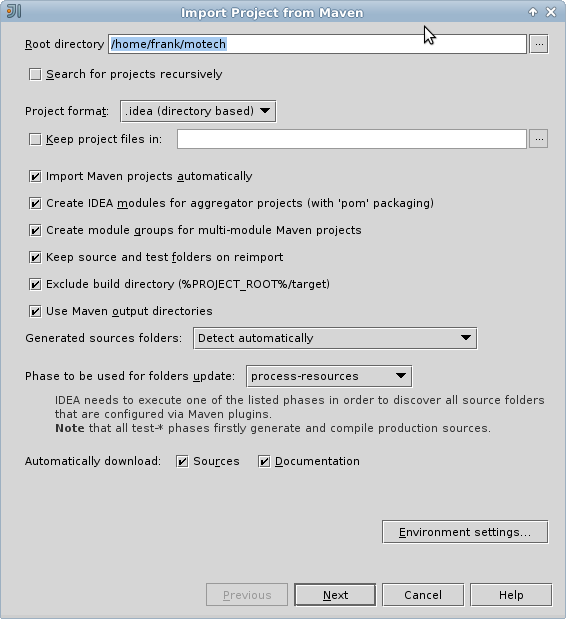
Select ~/motech/pom.xml, a dialog box will appear. Set the options as shown:
Click Next
In Select Profiles, do not select any profile, click Next
In Select Maven projects to Import, there should only be one project: org.motechproject:motech:0.20-SNAPSHOT, click Next
In Please select project SDK, if the 1.7.0_21 is present, select it, otherwise add it:
Click +
Select JDK
Select /home/frank/jdk1.7.0_21, then click OK
Click Next
Click Finish
Background processes will take a long time
You can also create a menu launcher, so you can start IntelliJ from the gui:
From the Tools menu select Create Desktop Entry
A IntelliJ menu item will be created in the Development application group
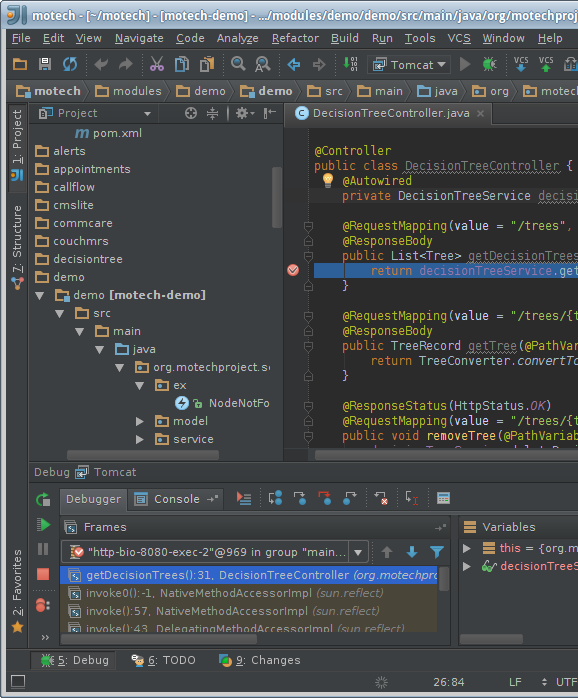
Debug demo module in IntelliJ
Start IntelliJ (from the command line, or from launcher icon if you created one)
It’ll automatically open the motech project (if it was the last project you worked on)
From the Run menu select Edit Configurations
Click on the green +
Select Remote
Give a name to your Run/Debug configuration and change the port to 8000 as:
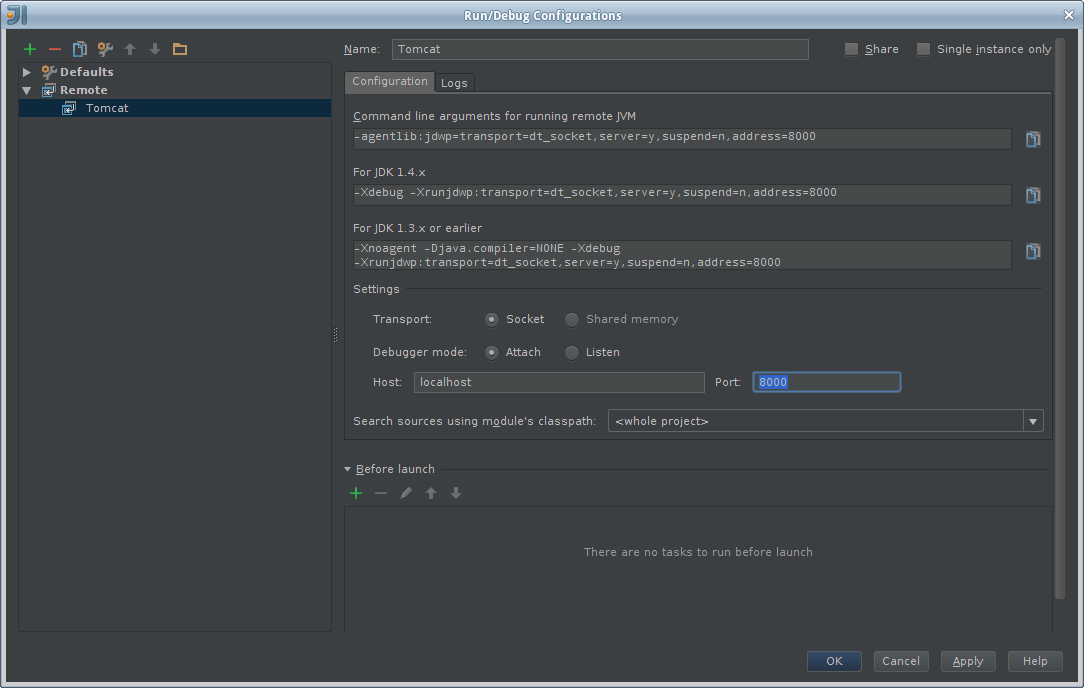
Hit OK
Set a breakpoint somewhere in the demo module code, i.e.:
From the Run menu, select Debug ‘Tomcat’ where Tomcat is the name of your configuration.
In the browser go to the place that will hit the breakpoint, i.e.: if you setup a breakpoint as in the previous screen, then in the Demo module, click the Decision Trees tab, and you should hit the breakpoint!