MOTECH first-run experience
Table of Contents
Bootstrap screen
Once you’ve installed MOTECH and started it for the first time, you’ll be welcomed by the following bootstrap screen. Here you’ll have to provide some basic configuration information for the MOTECH to load properly.
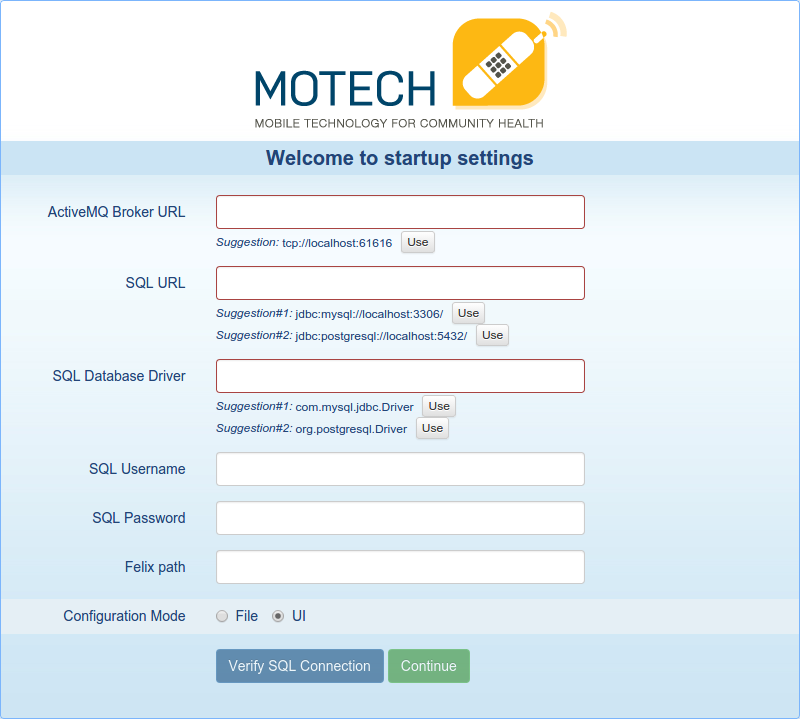
- ActiveMQ Broker URL
- The URL pointing to the ActiveMQ server. If you’ve installed ActiveMQ using the default settings, or by using the provided
install.shscript, you can simply clickUsebutton next to the first suggestion right under the text box. Otherwise, you must provide the correct URL.- SQL URL
- The URL pointing to the SQL server. If you’ve installed MySQL, or by using the provided
install.shscript, you can simply clickUsebutton next to the first suggestion. If you’ve installed Postgres using the default settings, you can simply clickUsebutton next to the second suggestion. Otherwise, you must provide the correct URL.- SQL Database Driver
- JDBC driver for the chosen database.
com.mysql.jdbc.Driverfor MySQL database.org.postgresql.Driverfor Postgresql.- SQL Username
- The username that MOTECH will be using for managing the database.
- SQL Password
- The password for the account with the username provided in the SQL Username.
- Felix path
- The location where OSGi cache should be stored.
- Configuration Mode
- The mode that will be used for further MOTECH configuration. Both modes will be explained in the following sections. Keep in mind that if you select the
FILEmode, you must provide a configuration file BEFORE progressing further. See Configuring MOTECH through FILE section for more information about how to prepare the configuration file.
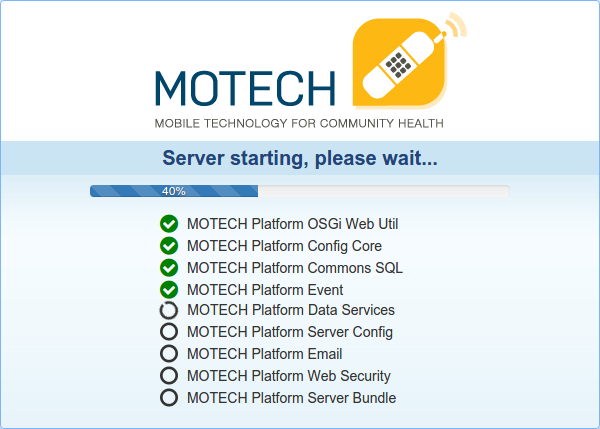
After you’ve filled up the bootstrap form and clicked Continue button, you will have to wait for the MOTECH to
start. The following screen will inform you about to the progress during MOTECH startup process.
MOTECH configuration
Once the MOTECH have started, it might require some more configuration depending on the selected configuration mode. If
you’ve selected UI as configuration mode jump to the `Configuring MOTECH through UI`_ section or to the
Configuring MOTECH through FILE section if you’ve selected FILE.
Configuring MOTECH through the UI
If you’ve selected the UI as the configuration mode, the following screen will be displayed.
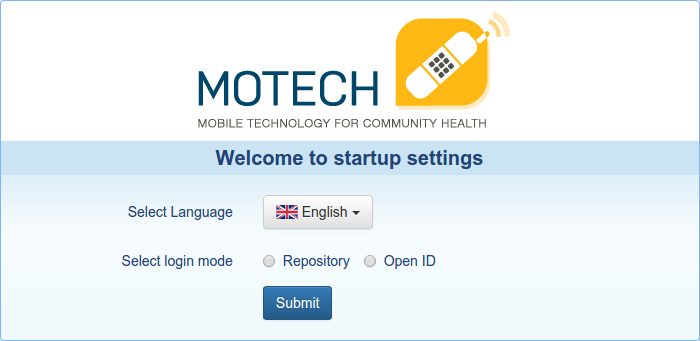
Here you are able to select the language MOTECH will be using, as well as one of the following login mode:
- Repository Using this mode will result in creating accounts locally.
- OpenID Using this mode will result in using the OpenID standard. For more information about the OpenID, please visit the www.openid.net website.
Repository login mode
If you’ve selected Repository as the login mode, the following screen will be displayed. Here you have to
provide the credentials for the administrator account.
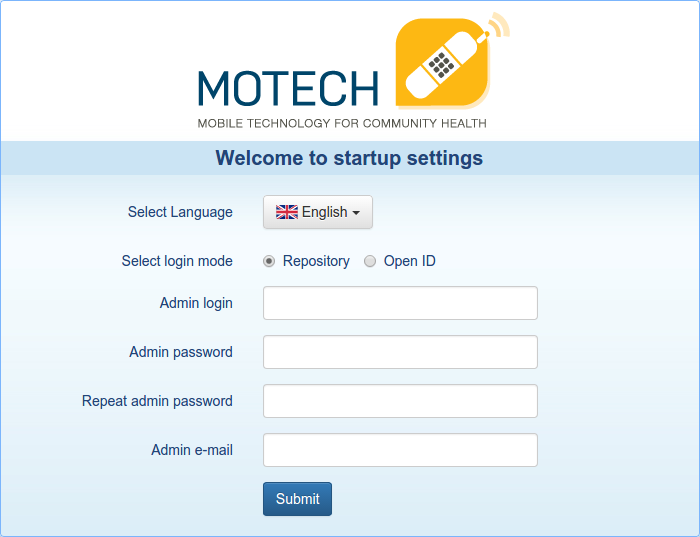
- Admin login
- The username of the administrator account.
- Admin password
- The password of the administrator account.
- Repeat admin password
- The password of the administrator account.
- Admin e-mail
- The e-mail of the administrator.
Once you’re done just hit Submit button and then continue to the First login through repository section.
OpenID login mode
If you’ve selected OpenID as the login mode, the following screen will be displayed. Here you have to provide the information about OpenID provider. For more information about the OpenID please visit www.openid.net website.
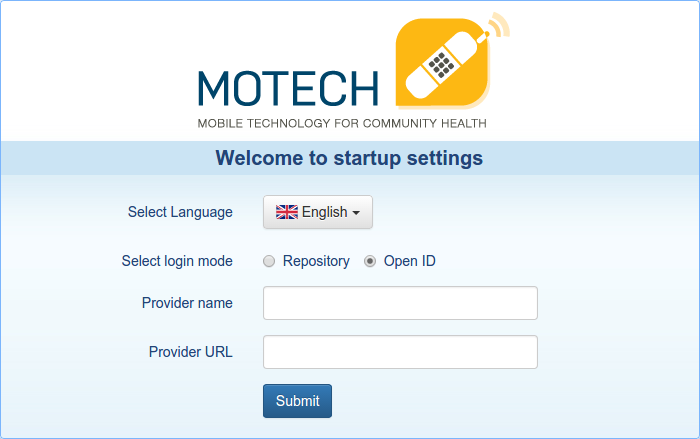
- Provider name
- Here you should type how do you want to call the provider.
- Provider URL
- Here you should put the URL that your OpenID provider uses for authentication.
Once you’re done just hit Submit button and then continue to the First login through OpenID section.
Configuring MOTECH through FILE
If you’ve selected this method of configuring MOTECH you’ll have to provide the configuration file. The file must have
the .properties extension and must be placed in the config subfolder of the MOTECH folder(most likely
/home/{username}/.motech/config) and must store the following properties.
- system.language
- The language the MOTECH will be using. The accepted values are
en,pletc.- login.mode
- The login mode that will be used. The accepted values are
repositoryandopenid.
Repository login mode
If you’ve selected repository as the login mode, the following screen will pop up. Here you’ll be able to create admin account by providing the credentials. Keep in mind that this is admin account and those credentials should be strong.

- Admin login
- The username of the administrator account.
- Admin password
- The password of the administrator account.
- Repeat admin password
- The password of the administrator account.
- Admin e-mail
- The e-mail of the administrator.
Once you’re done just hit Submit button and then continue to the First login through repository section.
OpenID login mode
If you’ve selected OpenID login mode, you’ll have to include two more properties into the file.
- provider.name
- The name of the OpenID provider.
- provider.url
- The URL that the OpenID provider uses for authentication.
Here’s an example file that uses OpenID mode.
system.language=en
login.mode=openid
provider.name=UbuntuOne
provider.url=https://login.launchpad.net/
Once you’re done just hit Submit button and then continue to the First login through OpenID section.
First login
Once you’re done with installing and configuring MOTECH, the first login screen(depending on the selected login mode) will pop up.
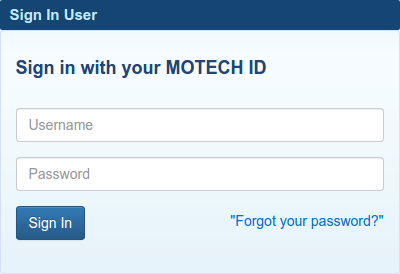
First login through repository
If you’ve chosen repository as the login mode, the following window will be displayed. Here you’ll have to enter the credentials you provided in the MOTECH configuration step.
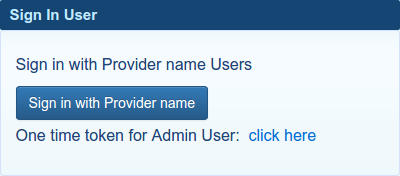
First login through OpenID
If you’ve chosen OpenID as the login mode, the following window will be displayed. Here, you’ll have to click on the
Sign in with Provide name button, which will result in redirecting you to the OpenID provider login page, where
you’ll have to enter valid credentials for that provider.