Modeling Data with MOTECH Data Services
Table of Contents
- Modeling Data with MOTECH Data Services
- Introduction
- MDS Entities
- MDS Lookups
- Data Services
- EUDE - End User Defined Entities
- DDE - Developer Defined Entities
- Defining entities - the @Entity annotation
- DDE entity fields - @Field and @Ignore annotations
- DDE relationships
- Common problems with relationships and their solutions
- Using DataNucleus annotations
- DDE service interfaces
- Defining editable lookups for DDE entities
- Programmatic usage of DDE entities
- Record versioning and optimistic locking
- MEDE - MDS Enhanced Developer Defined Entities
- Supported field types
- History tracking for entities
- MDS Trash Bin
- The MDS Data Browser
- Data browsing settings
- The REST API
- Entity validations
- MDS Lookup Service
- Executing custom queries
- Using Spring Transactions with MDS
- Security
- CRUD Events
- Instance Lifecycle Listeners
- Entities Migrations
- Schema Import/Export
- Javadoc
Introduction
MOTECH Data Services (MDS) is the data layer for the MOTECH Platform. MDS allows defining the data model both through code (using annotations or the exposed API) and the Schema Editor UI. It is capable of exposing generic services which allow executing CRUD operations on the defined model. It also is capable of exposing a fully functional REST API for the defined entities on the fly. Entities defined through means of code can always be extended or get their settings modified through the MDS Schema Editor or its underlying API.
- The benefits of MDS include:
- Generated user interface for data entry
- UI-based schema editor, and the ability to enhance developer-defined entities
- Generated OSGi services and Java APIs for accessing data objects
- Generated REST APIs for external data access
- Generated CRUD events for MDS entities (and exposure of these events via the Tasks module)
- Ability to register actions that execute on instances based on CRUD triggers
- Bulk import/export of data
- Change tracking (auditing) of data
- Object-level security
MDS uses DataNucleus underneath for persistence in a relational data store. Currently MDS officially supports two RDBMS engines MySQL and PostgreSQL. Javassist is used for code generation and OSGi mechanics such as bytecode weaving are used for replacing the code at runtime.
MDS generated entities bundle
All classes generated by MDS live in the mds-entities OSGi bundle, which gets generated at runtime and installed in the directory ~/.motech/bundles. The bundle is always regenerated when changes are made to the MDS schema. This generated bundle can also be downloaded using the following url: http://<motech_url>/modulemds/jar.
MDS Entities
MDS defines an Entity concept. An MDS entity maps directly to a POJO class and a table in the relational database. Entities consist of fields which are directly mapped to the object fields and columns in the database table. MDS supports multiple field types.
MDS integrates itself with the Tasks module, so a user can create a working application with a minimal amount of code. Entities generate task data providers which allow access to the data within MDS. Entities can also be configured to publish MOTECH events which are fired after CRUD operations are completed in MDS. These CRUD events, are exposed as task triggers in a dynamically generated task channel. CRUD actions are also exposed as actions within the task module, allowing users to create database manipulating logic through the tasks module.
We can group entities into three categories:
EUDE - End User Defined Entities. The entities created using the UI by the end user. These classes do not exist at compile time, but only after they are generated by MDS. Adding the bundle generated by MDS to the classpath will allow compile time access however. EUDE entities can also be defined using the MDS API through the EntityService. Users can view and create instances of the entities through the MDS Data Browser.
DDE - Developer Defined Entities. Developers can use annotations to mark their POJO classes as MDS Entities. These will be treated in the same way as EUDE entities, instances of the DDEs will also be accessible through the data browser. Users can still view the schema for these entities through the Schema Editor, add fields and modify settings(although they can’t remove fields declared by the developer in the java class).
MEDE - MDS Enhanced Developer Defined Entity. These are DDEs that were enhanced with additional fields added either through the UI or the Entity API. This are the same as DDE, but with additional fields added at runtime. Those fields can be accessed at compile time using Java Reflection API.
Automatically added fields
All entities in MDS will be enhanced with the following fields automatically:
| Name | Type | Description |
|---|---|---|
| id | Long | The id field of the entity, used to uniquely identify the instance. |
| owner | String | The username of the owner of the instance. This field can be used with security settings for the entity in order to filter access to only instance owners. |
| creator | String | The username of the creator of the instance. Automatically set to username of the MOTECH user that created the instance. Note that security can be set up to limit instance access to only creators of those instances. |
| modifiedBy | String | The username of the user that last modifier of the instance. Automatically set to the username of the user that last edited the entity. |
| creationDate | DateTime | The datetime on which this entity was created. Filled automatically. |
| modificationDate | DateTime | The datetime on which this entity was last modified. Updated automatically. |
Access to these fields can be done through reflections, through re-declaring them in the DDE class or by inheriting the MDSEntity class.
MDS Lookups
Lookups allow easily defining and executing queries on MDS entities. A lookup allows querying for a single or multiple fields. A lookup field is always corresponding to a single field in the entity. It can be also configured to either return a single or multiple results.
Note
If more then one instance matches the criteria of a single return lookup, the lookup will fail.
Lookups at this moment can only use AND logic for doing a query for multiple fields. For OR(or move complex) logic JDO queries have to be used. Lookups also allow comparing fields against provided parameters using a custom operator or using a range or set of values, defining such lookups is not supported through the UI at the moment though.
For each lookup two additional versions of the method will be generated. The first one is the same as the lookup, but with an additional parameter at the end - org.motechproject.mds.query.QueryParams. This class contains pagination directives - page number and page size, it also contains information about ordering the results - an org.motechproject.mds.util.Order object containing the sort direction and sort column. This version of the lookup is useful for operating on large data sets and providing ordered views to the user. The third version is the same as the basic lookup, but it returns a number (long) - the total count of the entity in the database. The name of the count method consists of count and the capitalized original lookup method name. For example for a lookup with a method name byName the count method will be called countByName.
Note
When defining a DDE, it doesn’t matter which version of the lookup you define, all three methods will be generated. For compile access to them however, they have to be explicitly defined in your service. More info on defining lookups in DDEs can be found in the section about defining DDE Data Services
Data Services
All access to entities in MDS is done through Data Services. These are services implementing the org.motechproject.mds.service.MotechDataService interface. They are exposed as OSGi service that can be retrieved from the OSGi BundleContext. All data access exposed by MDS, either the REST API, the UI data browser, Csv Import/Export etc. is done through these services. The class of the service is generated at runtime and it extends the base DefaultMotechDataService class. Developers can extend the **MotechDataService** interface in order to add their own lookups to the interface simply by declaring the method signatures and annotating them properly.
EUDE - End User Defined Entities
These entities are created by end users, either through the UI or using the exposed API. No programming knowledge is required in order to define an EUDE using the first method. Although these entities are not known at compile time(unless the jar generated by MDS is added to the classpath) programmatic access to these entities is still possible using Java Reflection API and some handy helper classes exposed by MDS - mainly the MdsLookupService.
Note
All EUDE classes share the same java package: org.motechproject.mds.entity
Creating EUDE through UI
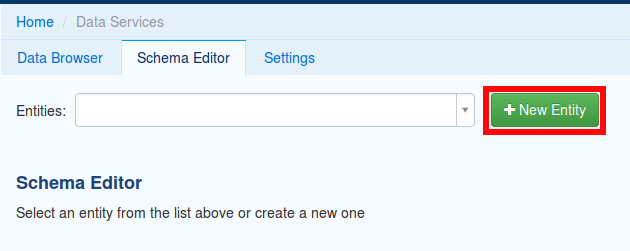
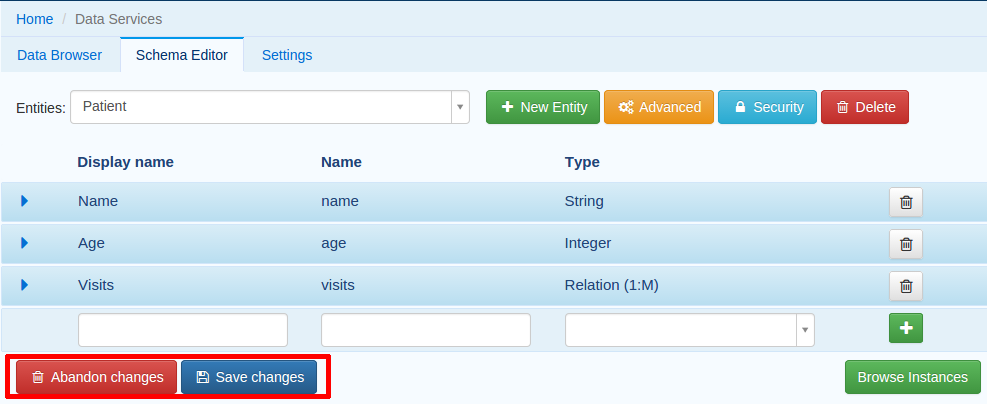
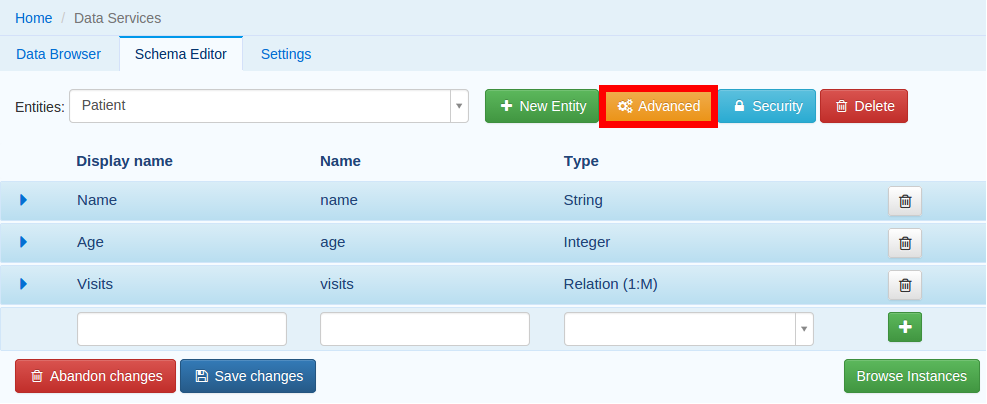
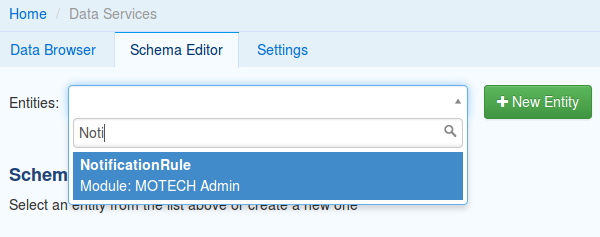
The easiest way to create EUDE entities is to use the MOTECH UI. First select Data Services from the left navigation menu(Modules menu), then navigate to the Schema Editor tab. You will see a dropdown allowing to select an existing entity for modification or deletion. Next to the dropdown menu you will see a New Entity button.
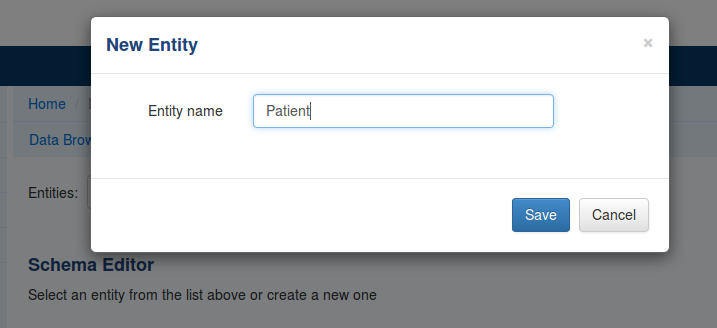
After that the user is asked for the name of the entity. This can be anything that is a legal name of a class in Java.
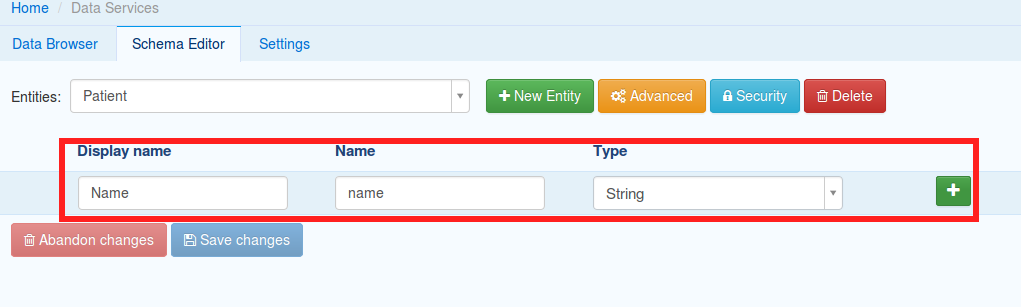
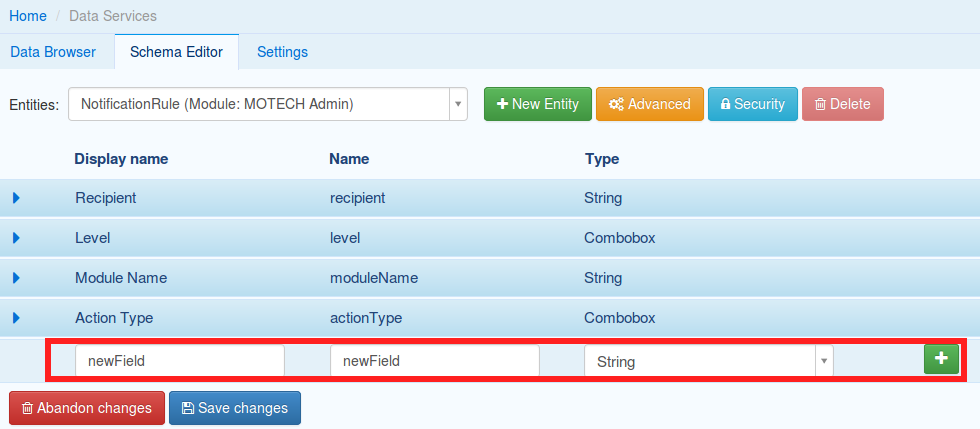
The view for managing entity fields is then displayed to the user. Users can add a field by selecting its type, choosing a name and a display name. ‘display name’ represents what will be visualised to the users in the MDS Data Browser, task editor etc. ‘name’ represents the actual name of the field that will be used for class and table creation. After this data is entered, hitting the green plus sign will add the field.
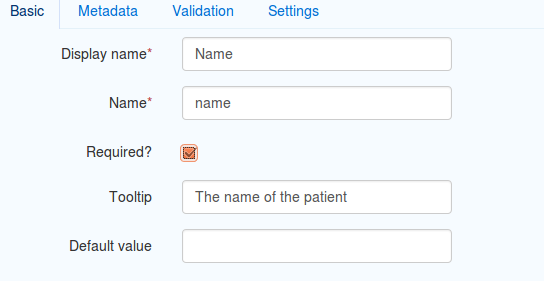
The field is then expanded and the user is presented with options to modify the field settings:
The Basic sections allows to change the previously entered name and display name, it also allows marking the field as required, meaning that users will be prevented from creating an instance without any value in this field. A default value for the field can also be entered, as well as a tooltip that will be shown to users creating instances of the entity.
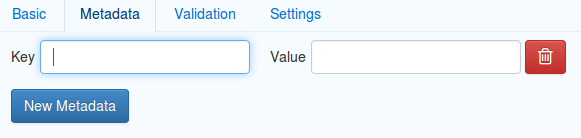
The Metadata section allows adding metadata to the field. This used internally by MDS for features such as relationships. End users should not worry about this section, but advanced users can add any values they wish for their own processing needs. Metadata is retrieved with the field schema using the Entity API. An example of using metadata could be a scenario when we are writing a third party export tool, that takes the MDS Schema and imports it into a 3rd party system. The field metadata can be used by that tool in order to recognize some fields as requiring special processing logic.
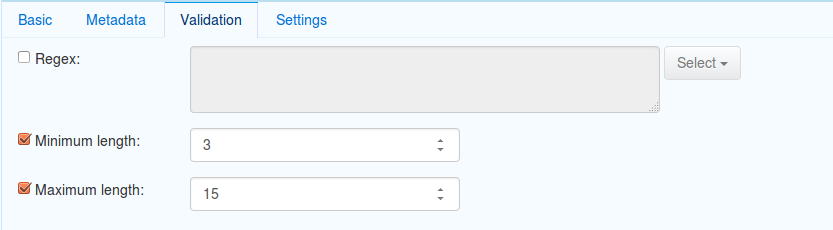
The Validation section allows setting specific validation rules for the field. Users will then be constrained by these validations when creating instances of the entity. Validations are type specific.
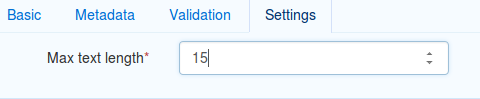
The Settings tab allows users to set type specific settings of the field. An example setting is the ‘Max text length’ of a String field, which indicates the maximum length of the string at the database level.
Existing fields can be deleted using the trash bin icon next to their type.

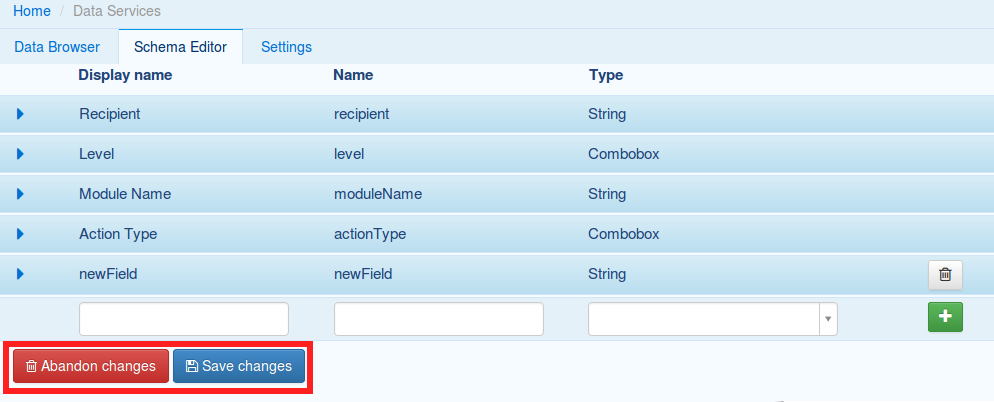
When the user is done modifying the entity, clicking Save changes will save the changes to schema and regenerate MDS entities. Clicking Abandon Changes will abandon all changes made by the user since the last save.
Defining a Lookup through the UI
Users can use the UI for adding lookups to an entity. These lookups can then be executed either directly through the data services or using the Data Browser UI. In order to add a new lookup, first open the advanced settings of an entity by clicking the ‘Advanced Settings’ button.
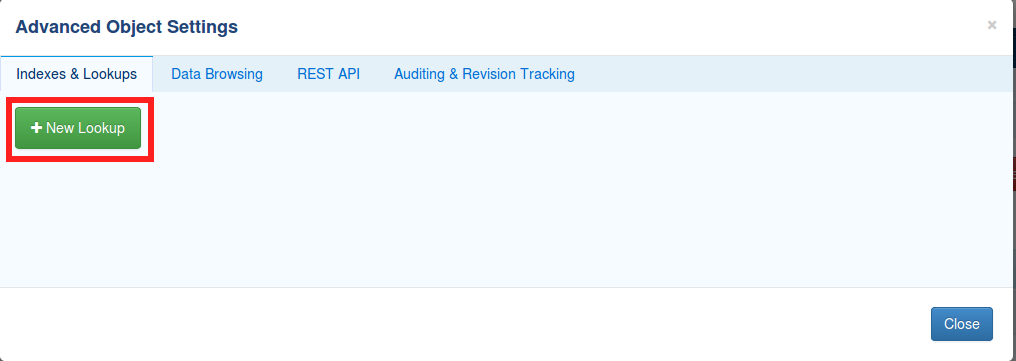
After that users can create lookups by clicking on the ‘New Lookup’ button.
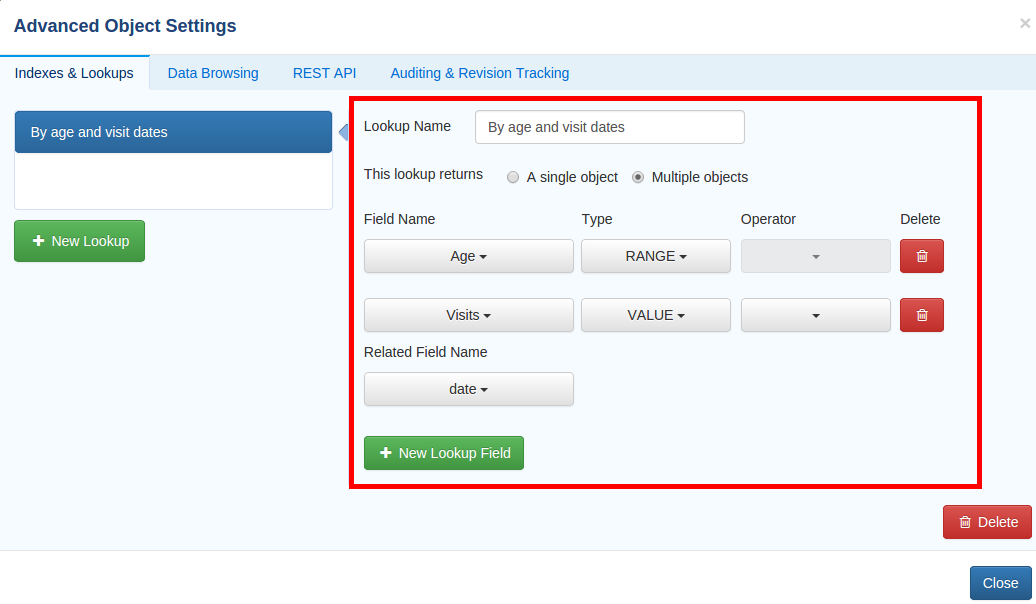
The name fo the lookup can then be modified as well as whether it returns a single or multiple objects. In order to make a lookup useful, it has be executed on a given set of fields, which can be added on the right side of the window by clicking the ‘New Lookup Field’ button and selecting the right field from the dropdown. They can be deleted using the trash bin button.
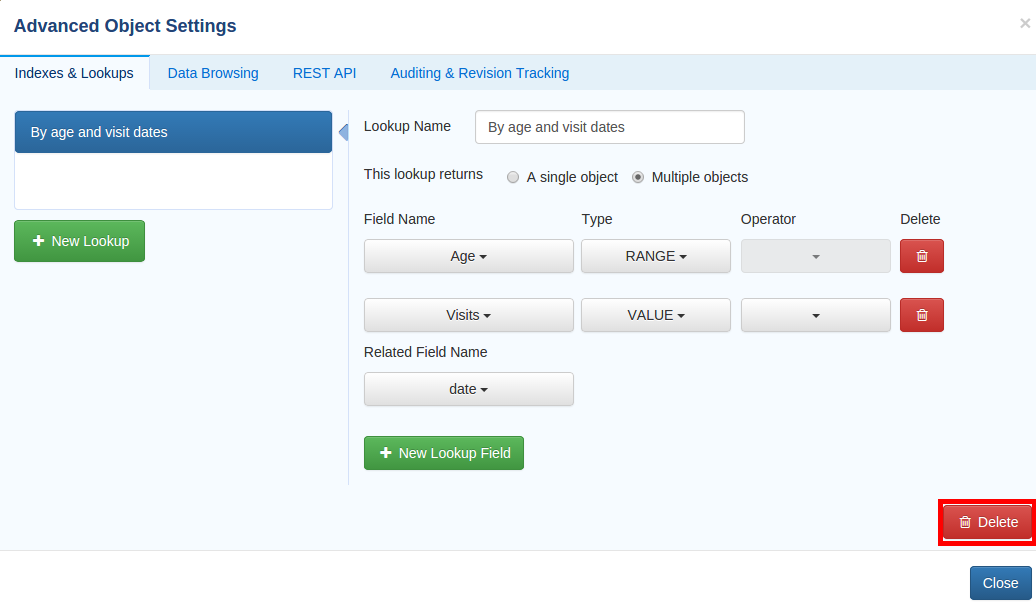
In order to remove a lookup, the delete button in the lower right of dialog can be used.
When the user is done adding lookups to an entity, clicking Save changes will save the changes and trigger regeneration. Clicking Abandon Changes will abandon all changes made by the user since the last save.
Creating EUDE through the Entity API
Creation of entities can be also done using the org.motechproject.mds.service.EntityService. This an OSGi service exposed by MDS which allows creation and modification of MDS entities, exposing everything that the UI does. In order to use the service it has to be retrieved from the OSGi context, either directly using the OSGi API or a Blueprint reference can be used to inject a proxy for that service directly as a Spring bean.
Example of retrieving the service manually:
import org.motechproject.mds.service.EntityService;
import org.osgi.framework.*;

...

public EntityService getEntityService() {
    // note that if using Spring, the BundleContext can be injected as any other bean
    // which allows skipping this step
    BundleContext bundleContext = FrameworkUtil.getBundle(EntityService.class).getBundleContext();

    // get the service reference from the bundle context
    ServiceReference<EntityService> ref = bundleContext.getServiceReference(EntityService.class);

    // return the service for the reference, or null if there are no references
    // the service should always be available, so a null reference definitely indicates some sort error
    return ref == null ? null : bundleContext.getService(ref);
}
and the preferred way using blueprint. Note that thanks to this declaration an EntityService bean becomes available in your Spring context.
<?xml version="1.0" encoding="UTF-8"?>
<beans xmlns="http://www.springframework.org/schema/beans"
    xmlns:xsi="http://www.w3.org/2001/XMLSchema-instance"
    xmlns:osgi="http://www.eclipse.org/gemini/blueprint/schema/blueprint"
    xsi:schemaLocation="http://www.springframework.org/schema/beans
        http://www.springframework.org/schema/beans/spring-beans.xsd
        http://www.eclipse.org/gemini/blueprint/schema/blueprint
        http://www.eclipse.org/gemini/blueprint/schema/blueprint/gemini-blueprint.xsd">

    <osgi:reference id="entityService" interface="org.motechproject.mds.service.EntityService"/>

</beans>
After getting hold of the service the entity can be created using the createEntity method:
EntityService entityService = getEntityService();

EntityDto entity = new EntityDto("Patient");

// the EntityDto instance returned will have the id value set
entity = entityService.createEntity(entity);
If we want to edit an existing entity, we can retrieve it using the EntityService:
// We can use the org.motechproject.mds.util.ClassName utility in order
// to get the EUDE class name given just the name
String className = ClassName.getEntityName("Patient");

// className is org.motechproject.mds.entity.Patient
EntityDto entity = entityService.getEntityByClassName(className);
When we have the EntityDto instance, fields can get added to the entity using the service and EntityDto returned:
// a simple integer field
FieldDto simpleField = new FieldDto("simpleInt", "Simple integer", TypeDto.INTEGER);

// a required name field
FieldDto nameField = new FieldDto("name", "Patient Name", TypeDto.STRING, true);

// an optional date of birth field, with a tooltip
FieldDto dobField = new FieldDto("dob", "Date of Birth", TypeDto.DATETIME, false, null,
        "Patients date of birth, leave blank if unknown");

// a required Social ID field, defaulting to 0
FieldDto socialIdField = new FieldDto("socialId", "Social ID", TypeDto.LONG, true, 0L);

// add the fields to the entity created earlier
entityService.addFields(entity, simpleField, nameField, dobField, socialIdField);
In order to make these changes take effect, data bundle regeneration must be triggered.
Creating Lookups through the API
Just as any other edits on the entity schema, lookups can also be created using the EntityService. In a similar fashion to fields, the addLookups method can be used for adding lookups to an entity. Given that we have the EntityDto object and the EntityService(), we can create lookups in the following manner:
// this lookup will check the name field, during an exact comparison
LookupDto lookupByName = new LookupDto("By name",
        true, // single object return
        true, // expose this lookup through REST
        Arrays.asList(new LookupFieldDto("name", LookupFieldDto.Type.VALUE)
));

// this a complex lookup using multiple fields
LookupDto complexLookup = new LookupDto("Complex lookup",
        false,  // return multiple objects
        false,  // do not expose by REST
    Arrays.asList(
        // the custom operator matches() will be used for querying on the name field
        new LookupFieldDto("name", LookupFieldDto.Type.VALUE, Constants.Operators.MATCHES),
        // the dob parameter will take a range, with a min and max value
        new LookupFieldDto("dob", LookupFieldDto.Type.RANGE),
        // for the state field, a set of possible values can be supplied
        new LookupFieldDto("state", LookupFieldDto.Type.SET),
        // the search through relationship fields is possible using the dot operator
        new LookupFieldDto("relationshipField.number", LookupFieldDto.Type.VALUE))
);

// add the lookup
entityService.addLookups(entity, lookupByName, complexLookup);
In order to make these changes take effect, data bundle regeneration must be triggered.
Regenerating the entities bundle
After we are done with modifications to the entity schema, we must trigger regeneration in order for the classes to get updated and made available in OSGi. For this we need to use org.motechproject.mds.service.JarGeneratorService, which we can retrieve the same way that we can retrieve the EntityService. Once we have an instance of the service, all we need to do is call the regenerateMdsDataBundle method:
JarGeneratorService jarGeneratorService = getJarGeneratorService();

jarGeneratorService.regenerateMdsDataBundle();
After the schema gets regenerated and all bundles using MDS get refreshed, the EUDE class should be available for use.
Programmatic access to EUDE entities
EUDE classes can be accessed using java reflections. This is an example of creating an instance using reflections:
// first get the interface class name of the name entity
// this helper method will always return org.motechproject.mds.entity.Patient
String interfaceName = ClassName.getInterfaceName("Patient")

// Retrieve the Data Service
MotechDataService service = ServiceUtil.getServiceForInterfaceName(bundleContext, interfaceName);

// Get the Class object for the entity
Class entityClass = service.getClassType();

// create a patient instance and set the name to "John"
Object instance = entityClass.newInstance();
PropertyUtil.setProperty(instance, "name", "John");

// save it using the service
service.create(instance);
As you can see the access is done through the Data Service. We can obtain the Class object for the generated class and use it for doing all required operations using reflections.
DDE - Developer Defined Entities
Developers can use annotated POJO classes in order to define the model for their application. Entities defined in this way will be treated in a similar fashion to EUDE entities, they can also be accessed using the MDS Data Browser. New fields can also be added to DDEs - so that they become MEDE.
DDEs are represented by actual Java classes used for defining them. OSGi bytecode weaving is used in order to enhance these classes at runtime and add additional fields for them. Because of this, these classes can be used with ease in code, since they are available during compile time to developers.
Defining entities - the @Entity annotation
In order to define a DDE by using the org.motechproject.mds.annotations.Entity annotation. This are the contents of Patient.java, an example fo a DDE entity:
package org.motechproject.example;

import org.motechproject.mds.annotations.*;

@Entity
public class Patient {

}
When the module containing this entity gets installed MDS will scan it for classes annotated with @Entity, and the class above would get picked up for processing. Schema for the entity is then generated and persisted in the database of MDS, the class is also enhanced by DataNucleus. The MDS weaving hook then replaces the bytecode for this class in module ClassLoaders with the DataNucleus/MDS enhanced version, making it available to the modules using it.
Note
The module must export the package of the entity in OSGi, using the Export-Package directive in its manifest.
The @Entity annotation has the following parameters:
name- The name of the entity displayed to the user. Defaults to the simple name of the annotated class.module- The name of the module for this entity. Defaults to the module name of the bundle from which this entity comes from.namespace- The namespace in which the entity is defined. Optional, defaults to empty.tableName- The actual name of the table in the database for this entity. Allows users to directly control the name in the data store. The default table name will take the form of:MDS_<MODULE>_<NAMESPACE>_<ENTITY_NAME>. If an entity has no namespace or module, those parts will be omitted.recordHistory- Set to true if MDS should record history for this entity.
DDE entity fields - @Field and @Ignore annotations
An entity does not have much use without any fields. MDS will treat any public field or field with public getter/setter in the class as an MDS field. In the class below, the field name will be picked up automatically as a field to be persisted in the database:
@Entity
public class Patient {

    private String name;

    public String getName() {
        return name;
    }

    public void setName(String name) {
        this.name = name;
    }
}
The @Field annotation can be used for more explicit marking and control over the fields basic properties. In the example below, the required parameter of the annotations is used to mark the name field as required, moreover the physical column name in the database is set to “P_NAME”:
@Entity
public class Patient {

    @Field(name = "P_NAME", required = true)
    private String name;

    public String getName() {
        return name;
    }

    public void setName(String name) {
        this.name = name;
    }
}
The @Field annotation could also be placed on the setter or getter methods for the same effect.
Not every public field, or not every field that has a public getter or setter has to be persisted in the database. The @Ignore annotation can be used for marking such field as not persistent:
@Entity
public class Patient {

    @Ignore
    public String name;
}
The name field in the example above will not become a database field and no MDS schema will be generated for it. This field will also not be accessible through the data browser.
DDE relationships
Creating relationships between entities is currently only possible for DDE. The definition of a relationship depends on the type of the relation. MDS supports one-to-one, one-to-many, many-to-many and master-detail relationships, both uni-directional and bi-directional. The way to define relationships for DDEs is presented in the examples below.
- One-to-one To create a one to one relationship, one of the related entities, should define a field of class, that represents the second entity. Both classes must of course be valid MDS Entities. The code below, provided that Book is an entity, will create a simple, uni-directional, one-to-one relationship between Author and Book.
@Entity
public class Author {
    @Field
    private String name;

    @Field
    private Book book;

    ...
}
- One-to-many To create a one to many relationship, one of the entities should define a collection of related entity. Just like in one-to-one relationships, both classes must be valid MDS entities to work. The code below shows an example of a simple, uni-directional, one-to-many relationship between Author and Book (one author is related with many books).
@Entity
public class Author {
    @Field
    private String name;

    @Field
    private Set<Book> book;

    ...
}
Bi-directional relationships The bi-directional relationship is a model, in which both sides of a relation are aware of the existence of a relationship and can both refer to the other side of a relation.
- To make the relationship bi-directional, two additional steps must be taken:
- The second entity must also define a relationship to the other entity
- Exactly one MDS field of a bi-directional relationship must be annotated with the @javax.jdo.annotations.Persistent(mappedBy = “fieldName”) annotation. The fieldName should correspond to the field name that is in a relationship, in the another entity.
Please see the code below, for an example of a one-to-many, bi-directional relationship.
@Entity
public class Author {
    @Field
    private String name;

    @Field
    @Persistent(mappedBy = "author")
    private Set<Book> book;

    ...
}

@Entity
public class Book {
    @Field
    private String title;

    @Field
    private Author author;

    ...
}
- Many-to-many Mds supports two types of many to many relationship. First type is M-N Set relation which is bi-directional, if you need more information you should read datanucleus M-N Set relation documentation. The code below shows an example of a many-to-many set relationship.
@Entity
public class Author {
    @Field
    private String name;

    @Field
    @Persistent(mappedBy = "author")
    private Set<Book> book;

    ...
}

@Entity
public class Book {
    @Field
    private String title;

    @Field
    private Set<Author> author;

    ...
}
Second type is M-N Indexed Lists relation which is modelled as 2 1-N unidirectional relations using join tables. Very important is to use the @IndexedManyToMany annotation at both ends of the relation instead of the @Persistent(mappedBy = “fieldName”). If you need more information you should read datanucleus M-N Indexed List relation documentation. The code below shows an example of a many-to-many indexed list relationship.
@Entity
public class Actor {

    @Field
    private String name;

    @Field
    @IndexedManyToMany(relatedField = "actors")
    private List<Movie> movies;

    ...
}

@Entity
public class Movie {

    @Field
    private String name;

    @Field
    @IndexedManyToMany(relatedField = "movies")
    private List<Actor> actors;

    ...
}
The code below shows an example how to properly use many-to-many indexed list relationship.
Actor actor1 = actorDataService.findByName("actor_1");
Actor actor2 = actorDataService.findByName("actor_2");
Movie movie = movieDataService.findByName("movie");

movie.getActors().add(actor1);
movie.getActors().add(actor2);
actor1.getMovies().add(movie);
actor2.getMovies().add(movie);

movieDataService.update(movie);
Note
To add an object to an M-N relationship you need to set it at both ends of the relation. You should also remember to define the methods equals and hashCode so that updates are detected correctly.
- Master-detail MDS also supports master-detail model, where entity can inherit some fields from another entity. This is achieved by simple class inheritance, using Java keyword extends. Naturally, both classes must be valid MDS entities for this to work. The code below shows an example of such master-detail model.
@Entity
public abstract class Config {
    @Field
    private String name;

    @Field
    private Map<String, String> properties;

    ...
}

@Entity
public class ModuleConfig extends Config {
    @Field
    private String moduleName;

    @Field
    private String moduleVersion;

    ...
}
Eager/lazy loading By default loading an entity with relationship will load its related entities, but that behaviour can be configured through @Persistent(defaultFetchGroup = “true/false”) annotation. Please see the code below for an example.
@Entity
public class Author {

    @Field
    private String name;

    @Field
    @Persistent(defaultFetchGroup = "false")
    private Set<Book> books;

    ...
}
By defining class this way the set of books won’t be fetched from the database unless it is explicitly said (e.g. by calling
getBooks()method on object of theAuthorclass) to. This approach simplifies the queries sent to the database and lower its overall usage.Lets take a look at the following example using
SubscriberandSubscriptionclasses.@Entity() public class Subscriber extends MdsEntity { @Field private Long callingNumber; @Field @Persistent(mappedBy = "subscriber") private Set<Subscription> subscriptions; ... }
@Entity
public class Subscription extends MdsEntity {

    @Field
    private String subscriptionId;

    @Field
    private Subscriber subscriber;

    ...

}
With the default approach query responsible for fetching subscriptions will look like this
SELECT 'entity.class.name.Subscription' AS
    NUCLEUS_TYPE,
    A0.creationDate,
    A0.creator,
    A0.id,
    A0.modificationDate,
    A0.modifiedBy,
    A0.owner,
    A0.subscriber_id_OID,
    A0.subscriptionId
FROM MOTECH_PLATFORM_DATA_SERVICES_TEST_BUNDLE_SUBSCRIPTION A0
    WHERE EXISTS (
        SELECT 'entity.class.name.Subscriber' AS
            NUCLEUS_TYPE,
            A0_SUB.id AS DN_APPID
        FROM MOTECH_PLATFORM_DATA_SERVICES_TEST_BUNDLE_SUBSCRIBER A0_SUB
            WHERE A0.subscriber_id_OID = A0_SUB.id)
which gets simplified to
SELECT 'entity.class.name.Subscription' AS
    NUCLEUS_TYPE,
    A0.creationDate,
    A0.creator,
    A0.id,
    A0.modificationDate,
    A0.modifiedBy,
    A0.owner,
    A0.subscriber_id_OID,
    A0.subscriptionId
FROM MOTECH_PLATFORM_DATA_SERVICES_TEST_BUNDLE_SUBSCRIPTION A0
    WHERE A0.subscriber_id_OID = 1
if we remove
Subscriptionsfield from the default fetch group (by adding@Persistent(defaultFetchGroup = "false") annotation to the :code:`Subscriptionsfield. This query requires one table scan less and won’t be sent to the database unless explicitly ordered to.
Common problems with relationships and their solutions
Problem: Accessing related fields throws javax.jdo.JDODetachedFieldAccessException or returns null
Explanation: By default, the metadata generated for the entities by MDS specifies that all fields are loaded eagerly. This means that the object retrieved from MDS data service will have all its fields and relationship set. This behaviour can be adjusted, by switching the strategy to lazy loading for certain fields. This is commonly done to improve the performance, since the objects will not be fetched from the database until they are accessed. You can read more about the eager and lazy loading strategies in MDS. Datanucleus will only be able to fetch lazy loaded fields if they are accessed within the same transaction. Accessing fields marked as lazy loaded, outside of the transaction will result in either javax.jdo.JDODetachedFieldAccessException, if the instance is in detached state or will return null, if the instance is in transient state.
Another possible reason of getting the aforementioned exception is accessing objects deep in the relationship chain. Depending on the properties that have been set, Datanucleus will fetch the whole relationship tree together with an object, or only relationships up to some certain level. This can be controlled using the maxFetchDepth property of the @Entity annotation and datanucleus properties. A value of -1 means that the whole relationship tree should be fetched.
Problem: Many-to-many relationship with lists does not work properly
Explanation: Since many-to-many relationship with lists is treated differently - as two one-to-many relationships, and due to several internal MDS issues, many-to-many relationship with lists must be modeled using our own @IndexedManyToMany. Please see usage instructions in the M:N relationships documentation.
Problem: While starting the server or module an InvalidRelationshipException is thrown
Explanation: The Motech Data Services module takes care, that all relationships are defined properly. In case it finds any problems with the relationship definitions, it will throw this exception, with an instruction on how to model the relationship properly. A general rule for bi-directional relationships is to place the @javax.jdo.annotations.Persistent annotation at exactly one side of a relationship. In case of many-to-many relationships, use our own @IndexedManyToMany annotation.
Problem: Creating/updating instance throws StackOverflowError
Explanation: A common mistake while modeling bi-directional relationships is including the relationship field in the hashCode and equals methods. Assume a bi-directional relationship between entities A and B and instances of those entities that point to each other. When Datanucleus attempts to calculate the hashCode or invoke equals method to compare the objects, it will fall into infinite loop, reading instance of entity A and B consecutively, until it runs out of space and throws StackOverflowError. Therefore, it is highly recommended that relationship fields are not used in the hashCode and equals methods. It is recommended that the hashCode and equals methods respect the Java guidelines for overriding these methods. Required and unique fields are the best candidates to use in these methods. Moreover, Datanucleus recommends that the ID field is not used in the hashCode method, as it may cause issue while detaching/attaching persistable object.
In rare conditions the StackOverflowError may originate from the Datanucleus L2 Cache and it is most likely a bug in Datanucleus. If such problem arises, please first make sure that all of the above conditions have been resolved. If it doesn’t help, the Motech Data Service exposes the evictAll method, that clears the entire Datanucleus cache. Moreover, it is possible to adjust the Datanucleus L2 cache settings or even turn it off completely. Please keep in mind that these steps may affect MDS performance.
Problem: CRUD operations on instances throw javax.jdo.JDOUserException: Cannot read fields from a deleted object
Explanation: The exception with the above message is thrown when Datanucleus attempts to perform operations on objects, that have been elsewhere deleted. This might include a scenario with several threads working on the same instance or caching a retrieved instance in a local variable and then accessing its related fields that have been deleted. Simple solutions to this problem include synchronizing the code or retrieving fresh instance of an object, before introducing any changes.
Problem: CRUD operations on instances with many-to-many relationship do not work properly
Explanation: There are several rules that must be followed while working with many-to-many relationships. As per Datanucleus contract, it is expected that the user takes care of the following things:
- the hashCode and equals methods must be set in all entities as mentioned in the hashCode / equals guidelines
- while adding an object to many-to-many relationship, it must be set on the both ends of the relation; otherwise, Datanucleus won’t know which side of the relationship is correct
- while deleting an object with many-to-many relationship, it must first be removed from the other side of the relationship, to avoid errors about an object being linked to other objects
- moreover, please see the Datanucleus documentation about many-to-many relationships
In case of other problems or explanations not being helpful enough, please contact us via mailing list, so we can investigate your case. You will get a faster response if you provide a piece of code that reproduces the issue.
Using DataNucleus annotations
DataNucleus JDO annotations can be used for enhancing DDEs. These annotations will be taken into consideration by DataNucleus and override the metadata that MDS generates. For example the @javax.jdo.Unique annotation can be used in order to mark fields in an entity as unique. Refer to the DataNucleus documentation for more information on using those annotations.
DDE service interfaces
DDEs can define their own interfaces that extend the default service interface that will be used for generating MDS services. The service will be published under that interface, and thanks to inheritance, it will also expose type safe methods from the base service. Here is an example of defining an interface for a ‘Patient’ DDE:
public interface PatientDataService extends MotechDataService<Patient> {

}
Thanks to this declaration type safe access to methods of the interface will be gained, the generic parameter Patient will be inserted for the returned/parameter values.
This way of defining services for DDEs also allows to define additional lookups on the service. These lookups are defined as plain method declarations with annotations and their implementation will be generated at runtime by MDS. The lookup method must be annotated with a @Lookup annotation. Method parameters should be marked with @LookupField annotation in order to connect the parameter with the actual entity field.
Note
If the @LookupField annotation is not present, MDS will fall back to an attempt to recognize the method parameter name, take note that this requires debug information at runtime, so you have to compile your classes appropriately.
public interface PatientDataService extends MotechDataService<Patient> {

    /*
     * This lookup finds a single patient based on the field 'name'.
     * So invoking this method like this: byName("John") will
     * return the patient with the name "John".
     */
    @Lookup
    Patient byName(@LookupField(name = "name") String name);

    /*
     * The count method. Note that if this method is not defined,
       it will be generated automatically from the lookup above.
     */
    long countByName(String name);

     /*
     * Same as above, but returns multiple results.
     */
    @Lookup
    List<Patient> byName2(@LookupField(name = "name") String name);

    /*
     * Same as above, but with QueryParams. Note that if this method is not defined,
       it will be generated automatically from the lookup above.
     */
    @Lookup
    List<Patient> byName2(@LookupField(name = "name") String name, QueryParams queryParams);
}
The type of the parameter must match the type of the field, unless its one of the two special types:
Range - ranges can be used for looking up values that fall within the given range. An example is a range of dates. Range consist of min and max values, it is possible to provide only one of these values so there will be no boundary on the second end.
public interface PatientDataService extends MotechDataService<Patient> {

    /*
     * Looks up patients for which the date of birth falls in the supplied range of
     * values. Example of usage:

        byDateOfBirth(new Range<>(DateTime.now().minusYears(30), DateTime.now().minusYears(10)));

     * this returns patients born between 30 and 10 years ago.
     */
    @Lookup
    List<Patient> byDateOfBirth(@LookupField(name = "dob") Range<DateTime> dobRange);

}
Set - Doing lookups by sets is also possible. Instead of providing a single value, you provide a set of values. If an instance field matches one of the values, that is considered a hit(basically this is logical OR matching).
public interface PatientDataService extends MotechDataService<Patient> {

    /*
     * Looks up patients which name matches one of the values from the set.
     * Usage example:
     *
     *  byName(new HashSet<>(Arrays.asList("Tom", "John", "Bob")));
     *
     * This will return patients named Tom, John or Bob.
     */
    @Lookup
    List<Patient> byName(@LookupField(name = "name") Set<String> names);

}
Lookups can also use custom operators. The operator is inserted between the field name and the lookup parameter in the JDO query generated for the lookup. The default symbol is ‘=’ - the equality sign, however different operators can also be used. Both JDO QL operators and methods can be used for lookups. If an operator like “<” is provided as the custom operator, it will be put between field name and parameter value. If the operator has the form a function like “matches()” it will generate a method call of the form “parameter.matches(value)” - the value is inserted between the brackets. In order to provide a custom operator for a lookup field, the customOperator field of the @LookupField annotation has to be set:
public interface PatientDataService extends MotechDataService<Patient> {

    /*
     * Does a matches() lookup on the name field.
     * Because matches() is used, a regex pattern can be passed as the parameter.
     */
    @Lookup
    List<Patient> byName(@LookupField(name = "name", customOperator = "matches()") String name);

}
Note
The list of standard JDO operators that can be used in lookups is defined as constants in the class org.motechproject.mds.util.Constants.Operators.
Defining editable lookups for DDE entities
One way to define lookups for DDE entities is to include a mds-lookups.json file in module resource directory.
The file should be a valid array of EntityLookups class objects. Every lookup defined in the file will be added
only once, so even after user had deleted lookup it won’t be recreated during module or MOTECH restart. This gives the
user complete control over those lookups without any restrictions. The unique identifier of every lookup is its
entity class name and lookup name combination. This is the intended way for modules to define lookups that should be
made editable by the end user. Backend code should not depend on these lookups.
Example mds-lookups.json file.
[
    {
        "entityClassName" : "org.motechproject.tasks.domain.mds.task.Task",
        "lookups" : [
            {
                "lookupName" : "Find Task by Owner",
                "singleObjectReturn" : false,
                "exposedViaRest" : false,
                "lookupFields" : [
                    {
                        "name" : "owner",
                        "type" : "VALUE",
                        "customOperator" : "\u003d\u003d",
                        "useGenericParam" : false
                    }
                ],
                "readOnly" : false,
                "methodName" : "findTaskByOwner",
                "fieldsOrder" : [
                  "owner"
                ]
            }
        ]
    }
]
Including the example json in Tasks module will result in adding lookup for Task entity that will return all tasks that are owned by the specified user.
Programmatic usage of DDE entities
All that has to be done in order to use a DDE is to retrieve the service for its interface. Because of the nature of DDEs, their classes are available during compile time. The service reference can be then retrieved using the standard OSGi facilities:
public PatientService getPatientService() {
    BundleContext bundleContext = FrameworkUtil.getBundle(Patient.class).getBundleContext();
    ServiceReference<PatientService> ref = bundleContext.getServiceReference(PatientService.class);
    return ref == null ? null : bundleContext.getService(ref);
}
The preferred way however is to use Blueprint OSGi references. The service will be injected as a Spring bean into the Spring application context of the module and can be then used as any other bean(for example it can be @Autowired into other beans).
<?xml version="1.0" encoding="UTF-8"?>
<beans xmlns="http://www.springframework.org/schema/beans"
    xmlns:xsi="http://www.w3.org/2001/XMLSchema-instance"
    xmlns:osgi="http://www.eclipse.org/gemini/blueprint/schema/blueprint"
    xsi:schemaLocation="http://www.springframework.org/schema/beans
        http://www.springframework.org/schema/beans/spring-beans.xsd
        http://www.eclipse.org/gemini/blueprint/schema/blueprint
        http://www.eclipse.org/gemini/blueprint/schema/blueprint/gemini-blueprint.xsd">

    <osgi:reference id="patientDataService" interface="org.motechproject.example.PatientService"/>

</beans>
Once the service instance is obtained, the only thing left to do is to just call the right method exposed.
Note
Usually a module should provide a service layer between the end user and the data layer implemented by MDS. It is not required however and left to the implementer.
Record versioning and optimistic locking
DDE entities support versioning of records. A version will be automatically increased after each update. This feature is useful when other user or other thread is working with the same record. When user performs update but record has been changed before this update an optimistic exception will be thrown. To enable versioning for the entity developer can extend MdsVersionedEntity or can use the @Version annotation. The following example shows how to use the annotation.
@Entity
@Version(strategy = VersionStrategy.VERSION_NUMBER, column = "version",
    extensions={@Extension(vendorName = "datanucleus", key="field-name", value="version")})
public class VersionedEntity {

    @Field
    private Long version;
}
Note
Very important with REST API is to expose version field.
MEDE - MDS Enhanced Developer Defined Entities
MEDE, MDS Enhanced Developer Defined Entities, are the DDE that were enhanced by users with additional fields at runtime. In practice they are not much different from DDEs. The only difference lies in the additional fields added at runtime. These fields are not part of the class at compile time, so access to these fields has to be done using reflections. They can also be set through the MDS Data Browser, so this is a way for nontechnical users to attach their own schema to the model.
Extending DDEs through the UI
Extending DDEs through the UI is not different from manipulating the schema of EUDE entities. Refer to the documentation section on creating EUDE entities for more info. In order to extend a DDE first go the MDS Schema Editor and select the DDE entity you wish to edit:
Next add the field you wish to add to the entity:
You can also add lookup to the DDE:

Finally, save your changes to trigger MDS schema regeneration and make your changes take effect(you can also abandon your changes if you wish):
Extending DDEs through code
Extending DDEs through code is no different from extending EUDE entities. The only difference is that the EntityDto for the DDE has to be retrieved by providing its class name. Refer to the documentation on extending EUDE through code.
Supported field types
MDS supports multiple types
| MDS Type | Java type | MySQL DB type | PostgreSQL DB type | Description |
|---|---|---|---|---|
| Blob | java.lang.Byte[] | mediumblob | bytea | A huge binary object, used to represent binary objects such as files or images. |
| Boolean | java.lang.Boolean | bit(1) | boolean | A boolean field, that can take either true or false as value. |
| Combobox | Based on settings: enum enum collection java.lang.String String collection | separate table separate table varchar separate table | separate table separate table varchar separate table | A combobox showing users a selection of predefined values. It can take single or multiple selections and can be configured to take user defined values. |
| java.util.Date | datetime | timestamp with time zone | A type representing the java.util.Date. Only available for DDE. | |
| org.joda.time.LocalDate | date | date | A type representing the LocalDate class from the Joda library. Does not represent time, only date. Only available for DDE. | |
| org.joda.time.DateTime | datetime | timestamp with time zone | A type representing the DateTime class from the Joda library. Only available for DDE. | |
| Date | java.time.LocalDate | date | date | A type representing the LocalDate class from Java8 time API. Does not represent time, only date. |
| DateTime | java.time.LocalDateTime | datetime | timestamp with time zone | A type representing the LocalDateTime class from Java8 time API. |
| Decimal | java.lang.Double | double | double precision | A decimal field number. |
| Integer | java.lang.Integer | int(11) | integer | An integer number. |
| Locale | java.util.Locale | varchar | varchar | A type representing locale. Users will be shown a locale selection dropdown for type. |
| Map | java.util.Map | Separate table | Separate table | A map of key-value pairs. |
| Period | org.joda.time.Period | varchar | varchar | A type representing the Period class from the Joda library. Represents a period in time, i.e. 3 months. |
| String | java.lang.String | varchar | varchar | A string of characters. The max length can be configured. For long text fields, consider using TextArea. |
| TextArea | java.lang.String | mediumtext | text | A string of characters without max length. Suited for long text fields. |
| Time | org.motechproject. commons.date.model Time | varchar | varchar | A time representation without any date or timezone information. |
Map type
You can declare map with keys and values having generic type. MDS supports the following types of generics :
- key types (String, Integer, Long)
- value types (String, Integer, Long)
If you use the supported types, the field will be stored as a separate table in a database. Otherwise the field will be serialized.
Note
In a separate table map keys will be treated as primary keys. By default max key length in InnoDB is 767 bytes. When the innodb_large_prefix configuration option is enabled, this length limit is raised to 3072 bytes, for InnoDB tables that use the DYNAMIC and COMPRESSED row formats. Here you can find more details : http://dev.mysql.com/doc/refman/5.6/en/innodb-parameters.html#sysvar_innodb_large_prefix
History tracking for entities
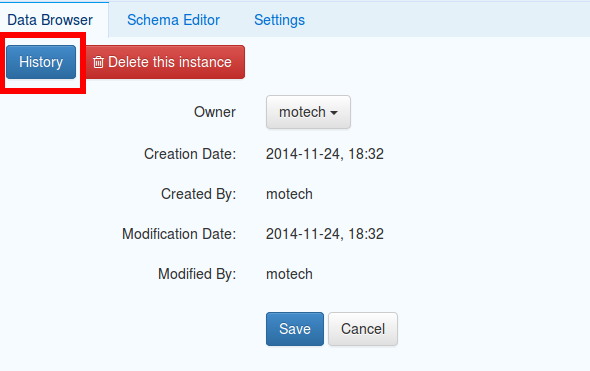
MDS allows to keep track of any changes made on the instances, as well as reverting the state of an instance to a concrete revision. Both viewing the history of an instance and reverting can be done via the code and UI. This feature will only be available if you explicitly set, that the history tracking for your entity should be enabled. If you want to view the history for your instance via UI, simply go to the detailed view of that instance, and click on the History button.
Note
If you introduce any changes to the entity definition (e.g. add or delete a field), you will still be able to view the state of an instance, but you will lose the ability to revert an instance (because of a schema mismatch).
Controlling whether to record history
By default MDS doesn’t keep track of the instance revisions. Most of the DDEs that come with MOTECH modules have the tracking of the history disabled as well. To enable history tracking for the...
- Developer Defined Entity (DDE) - You have to set the recordHistory parameter of the @Entity annotation to true.
@Entity(recordHistory = true)
End User Defined Entity (EUDE) - The Enable history audit option is available under the Advanced window of an entity, in the Auditing & Revision Tracking tab

Retrieving history using code
MDS exposes an implementation of the org.motechproject.mds.service.HistoryService. To make use of it, you should simply create a reference to that service in your blueprint:
<osgi:reference id="historyServiceOSGi" interface="org.motechproject.mds.service.HistoryService" />
From now on, you will be able to use the history service, just like any other Spring bean, for example, by placing the @Autowired annotation on a field of type org.motechproject.mds.service.HistoryService. The service allows recording history, deleting the whole history for an instance and retrieving the historical revisions of an instance.
MDS Trash Bin
When an instance is deleted, it can either be removed completely or moved to the trash. In case an instance is moved to the trash, there will be an ability to view all instances that have been deleted, as well as to restore any instance from the trash. Users may also choose to empty the trash from time to time. All the data retention settings are available in the MDS settings tab. If you choose to empty the trash, MDS will use the scheduler to set up a job, that runs every specified period and empties the trash.
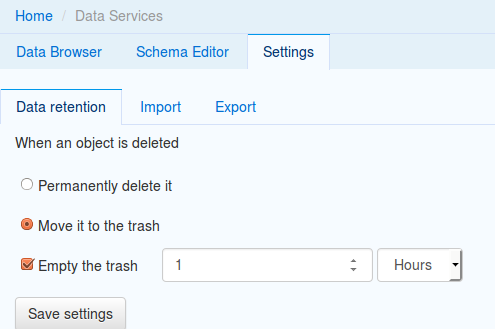
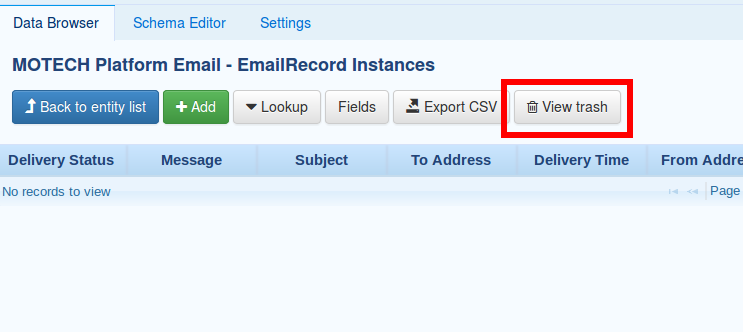
To view instances that have been moved to the trash, click the View trash button, after selecting an entity in the data browser. To restore any instance from the trash, select that instance and click Restore button on the detailed view of the deleted instance.
Note
If you introduce any changes to the entity definition (e.g. add or delete a field), you will lose access to all the deleted instances of the previous schema. That means you will no longer be able to view or restore them anymore.
Using Trash using code
Similar to the HistoryService mentioned above, MDS also exposes the TrashService that allows operations on the Trash bin from the code. To use the exposed service, create a reference in your blueprint file:
<osgi:reference id="trashServiceOSGi" interface="org.motechproject.mds.service.TrashService" />
Accessing the service also works the same way as with the HistoryService - treat it as any other Spring bean, for example by placing the @Autowired annotation on the field of type org.motechproject.mds.service.TrashService. The trash service allows to place instances in trash, retrieve instances from trash, schedule the trash purging, empty the trash and check current data retention settings.
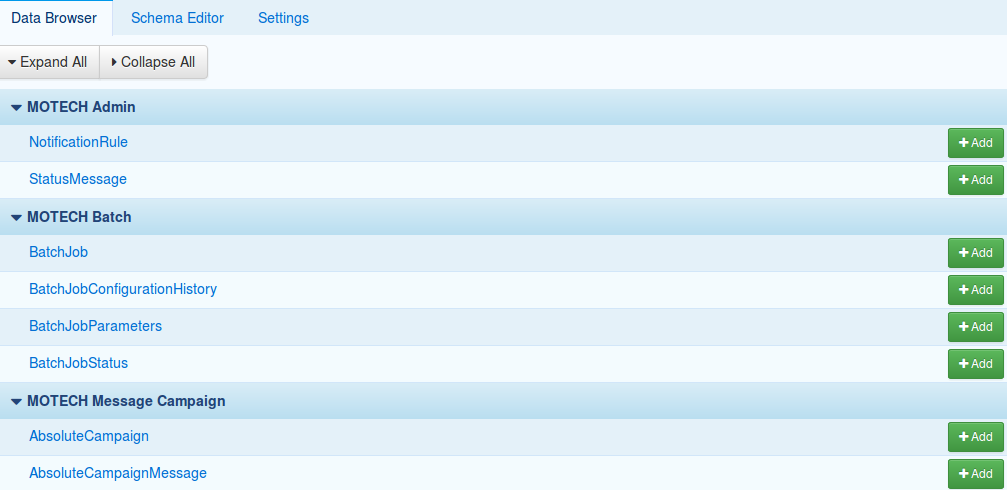
The MDS Data Browser
The data browser is a place, where you can perform CRUD operations on the instances of an entity. The main window of the data browser shows a list of all entities, grouped by modules to which they belong. From this point, you can choose to view instances of a certain entity by clicking on the name of that entity, or add an instance of an entity by pressing the Add button, next to the entity name.
If you pick one of the entities, you will be brought to the view, showing the instances of that entity. From this view, you can perform several operations on the instances.
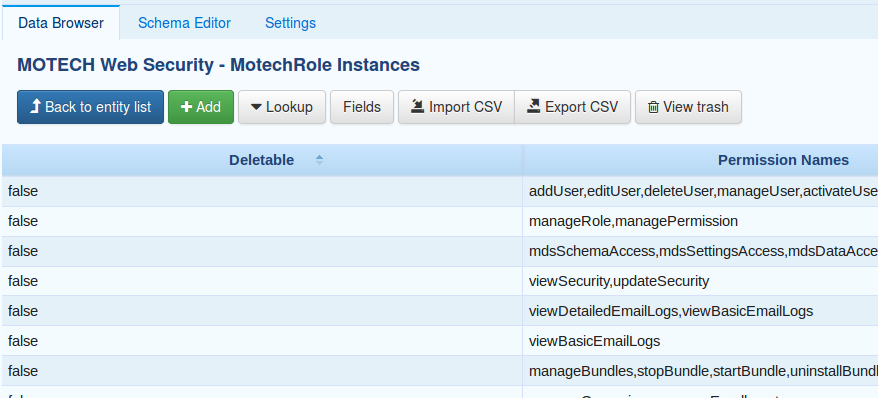
| Button | Role |
|---|---|
| Back to entity list | Brings you back to the main data browser view, listing entities |
| Add | Brings you to the Add instance dialog, where you can add an instance of an entity |
| Lookup | Allows you to view only instances that match certain criteria. The definition of these criteria are set in the Advanced dialog on the Schema Editor |
| Fields | Allows you to display only certain fields in the browser. Useful when your entity has got a lot of fields, and you are only interested in few of them |
| Import CSV | This option allows the import of instances from a CSV file. If there is an instance with the same id present both in the database and the file, it will get updated with the values from the file |
| Export CSV | This option allows the export of all instances of the selected entity to the CSV file |
| View trash | Allows to view all instances that have been moved to the trash, on the current entity schema |
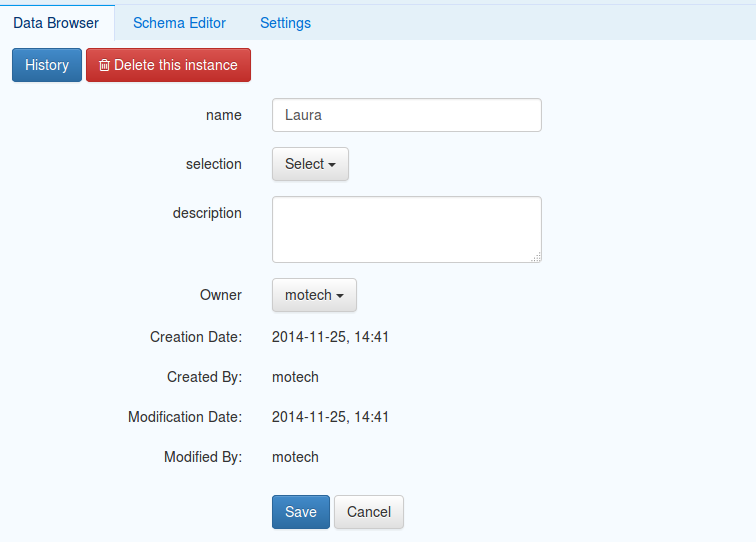
If you click on any instance, a detailed view for that instance will be shown. Depending on the entity definition, necessary input fields will be presented, where you can set the values for these fields. You may also choose to delete that instance or view the revision history (if history tracking is enabled for that entity). When you are done editing an instance, click the Save button. To abandon changes, click Cancel.
Data browsing settings
The data browsing settings allow to control several data browser UI options for an entity. Available options are:
- The ordering of the entity fields
- The fields to display on the UI by default
- Allow filtering by chosen field values (only available for some types)
- Change UI representation for relationship type fields.
The automatically generated fields are not displayable by default, but all other fields are. The display order is determined based on the order in which they were added. No fields will be marked filterable by default.
Note
The data browser filters can currently only be generated for the Date, DateTime, LocalDate, Boolean and List types.
Changing the settings through the UI
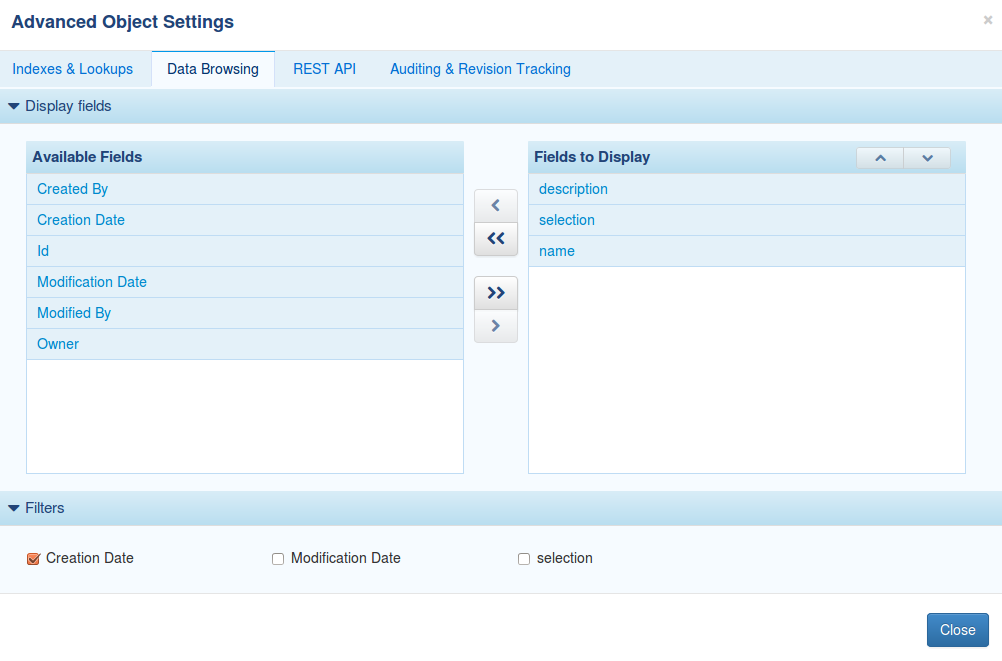
To change the data browsing settings via UI, go to the Schema Editor and select an entity for which you wish to set the settings. Go to the Advanced view and pick the Data Browsing tab. The first section, called Display fields, contains two tables. The table to the right shows fields that have been selected to display by default. The table to the left shows all other fields. The order of the fields in the Fields to display table corresponds to the order of the fields in the data browser UI. You can move fields from one table to another and change their order, using provided buttons, or by dragging the fields to their destination. The second section, named Filters allows to pick fields, for which the data browser UI will generate filters. Please note that only fields of a certain types will be displayed. The filters are generated automatically and are adjusted to the field type. For example, for the date types, there will be an option to set a filter for today, this week, this month and this year, while for boolean, this will be only true and false. When you finish making the changes, close the Advanced window and click Save changes.
Changing the settings through annotations
The data browsing settings can also be set using MDS annotations. The two annotations that allow this are @UIDisplayable and @UIFilterable. Similar to the @Field annotation, they can be placed on fields, as well as on getters and setters. The @UIFilterable annotation will work only, when placed on the field of a supported type.
Note
If you use the @UIDisplayable annotation on any field of your entity, all other fields, that lack the annotation, will be marked as not displayable.
By default, all fields defined in the entity will be marked as displayable. The @UIDisplayable annotation allows changing this behaviour. If at least one field is marked with the @UIDisplayable annotation, the default behaviour will not be applied, and only annotated fields will be marked displayable. The annotation contains optional position parameter, that allows to pick the position of the field on the data browser UI. The ordering should start with the number zero. Fields are not UIFilterable by default. To allow filtering by field values on the data browser, simply annotate that field with @UIFilterable.
The following code presents the usage of the two annotations:
@Field
private String externalId;

@Field
@UIDisplayable(position = 0)
private String name;

@Field
@UIDisplayable(position = 2)
@UIFilterable
private DateTime dateTime;

@Field
@UIDisplayable(position = 3)
private Long priority;

@Field
@UIDisplayable(position = 1)
private String description;
Changing the UI representation of relationship type fields through annotation
The way relationship type fields are displayed can be changed through the @UIRepresentation annotation. This annotation can be placed on a method which takes no arguments and returns String. The @UIRepresentation annotation works only when placed on supported method.
Note
Use the @UIRepresentation annotation only on method for an entity.
By default, the toString method of an entity would be used to get the display value. You can customize this with the @UIRepresentation annotation.
The following code presents the usage of the annotation
@Field
private String externalId;

@Field
private String name;

@UIRepresentation
public String displayValue() {
        return "Sample Display Value";
}
The REST API
MDS REST API allows to perform CRUD operations on the instances of an entity. By default, no operations are allowed via REST, which means that an administrator, must explicitly allow an access via REST to an entity. Even when an access via REST is enabled for an entity, valid MOTECH credentials must be provided in order for a request to be processed. MDS REST API uses a BASIC access authentication method by default, but that can be changed using dynamic security rules (can be done on a per entity basis). Moreover the standard MDS entity level security will also apply.
REST endpoints
The general endpoint to the MDS REST operations is:
http://<motech-server-address>/module/mds/rest/<<path>>
The table below explains what HTTP request method are supported for each of the CRUD operation, as well as how the “path” should look like.
| Operation | HTTP requests | Paths | Notes |
|---|---|---|---|
| Create | POST | /{moduleName}/{namespace}/{entityName}
/{moduleName}/{entityName}
/{entityName} |
The data sent with the request should contain JSON representation of the object |
| Read | GET | /{moduleName}/{namespace}/{entityName}
/{moduleName}/{entityName}
/{entityName} |
Can take multiple params, like ?page=1&pageSize=20&sort=name |
| Read - Lookup | GET | /lookup/{moduleName}/{namespace}/{entityName}/{lookupName}
/lookup/{moduleName}/{entityName}/{lookupName}
/lookup/{entityName}/{lookupName} |
Can take multiple params, like ?page=1&pageSize=20&sort=name Lookup parameters should be provided as request parameters. |
| Update | PUT | /{moduleName}/{namespace}/{entityName}
/{moduleName}/{entityName}
/{entityName} |
The instance to update will be determined on the id, taken from included JSON representation |
| Delete | DELETE | /{moduleName}/{namespace}/{entityName}/{instanceId}
/{moduleName}/{entityName}/{instanceId}
/{entityName}/{instanceId} |
Note
EUDE are never assigned to any module. For DDE, the module name should not contain the “motech” or “motech-platform” prefix, if the module has one.
Response codes
These are the response codes returned by the MDS REST API:
- 200 OK - The operation was successful. Note that delete is idempotent, meaning 200 will be also returned for already deleted items.
- 400 Bad Request - The body or parameters provided in the request are invalid.
- 401 Unauthorized - The caller is not authorized and thus not permitted to execute the operation.
- 403 Forbidden - The user does not have necessary rights to execute the operation.
- 404 Not Found - Either the given entity or the requested object does not exist.
- 500 Internal Server Error - The request cannot be processed due to a server error.
Read response
In case of read operations Motech also adds metadata to the response. Response is divided into two sections: metadata and data. The metadata contains following fields:
| Name | Description | Type |
|---|---|---|
| entity | The entity name of the instances. | String |
| className | The name of the entity class. | String |
| module | The module name of the entity. Null in case of EUDE entity. | String |
| namespace | The namespace in which the entity is defined. | String |
| totalCount | The total number of instances that match the search conditions. 1 i
case of retrieving with id parameter or with a single object
lookup. |
Long |
| page | The page number. | Integer |
| pageSize | The page size. | Integer |
Below you can find sample response:
{
  "metadata": {
    "entity": "EmailRecord",
    "className": "org.motechproject.email.domain.EmailRecord",
    "module": "MOTECH Platform Email",
    "namespace": "",
    "totalCount": 2,
    "page": 1,
    "pageSize": 20
  },
  "data": [
    {
      "id": 1,
      "creator": "admin",
      "owner": "admin",
      "modifiedBy": "admin",
      "deliveryStatus": "SENT",
      "toAddress": "adress1@organisation.com",
      "subject": "Subject 1",
      "message": "Sample message",
      "fromAddress": "adress2@organisation.com",
    },
    {
      "id": 2,
      "creator": "admin",
      "owner": "admin",
      "modifiedBy": "admin",
      "deliveryStatus": "SENT",
      "toAddress": "adress1@organisation.com",
      "subject": "Subject 2",
      "message": "Other message",
      "fromAddress": "adress2@organisation.com",
    }
  ]
}
Parameters and lookups
When retrieving the instances using MDS REST API (GET request), there’s an ability to apply some parameters, to have a better control on the result of the request. The parameters are applied as any other GET request parameters.
- id Return a single instance, with the provided id
- pageSize Defines an amount of instances that should be returned per request (defaults to 20)
- page Defines a result page that should be returned (defaults to 1)
- sort Defines a column that should be used to sort the instances in the result
- order Either “asc” or “desc”
- lookup A name of lookup that should be used to retrieve the instances. A lookup must be marked as exposed via REST in order for this to work. The values used in the lookup should be provided as GET request parameters. This an alternative way of calling a lookup, rather than calling it through the lookup url described above.
Below, you will find some examples of valid REST URLs. Assume our entity is called MyEntity.
http://<<address>>:<<port>>/motech-platform-server/module/mds/rest/MyEntityReturn 20 records from the first page (default settings applied)http://<<address>>:<<port>>/motech-platform-server/module/mds/rest/MyEntity?id=15Return an instance with id 15http://<<address>>:<<port>>/motech-platform-server/module/mds/rest/MyEntity?page=2&pageSize=50&sort=name&order=ascReturn 50 records from the second page, having sorted the instances by name field ascendinghttp://<<address>>:<<port>>/motech-platform-server/module/mds/rest/MyEntity?lookup=byName&name=LauraExecutes a lookup named “byName” with the lookup field “name” being “Laura” on the entity “MyEntity” and returns results.
REST fields exposed
By default all fields are marked as exposed via REST, both for DDE and EUDE. If you choose to hide some of them, they will simply be ignored, when performing CRUD operations via REST on them. When retrieving instances, the result will not contain the fields that are not exposed and when updating or creating instances, the hidden fields will be ignored, even if they are present in the provided JSON representation.
Changing REST settings through the UI
You can access the REST API settings by selecting an entity in the Schema Editor and then opening the advanced settings, by clicking on the Advanced button. On the new window, navigate to the REST API tab.
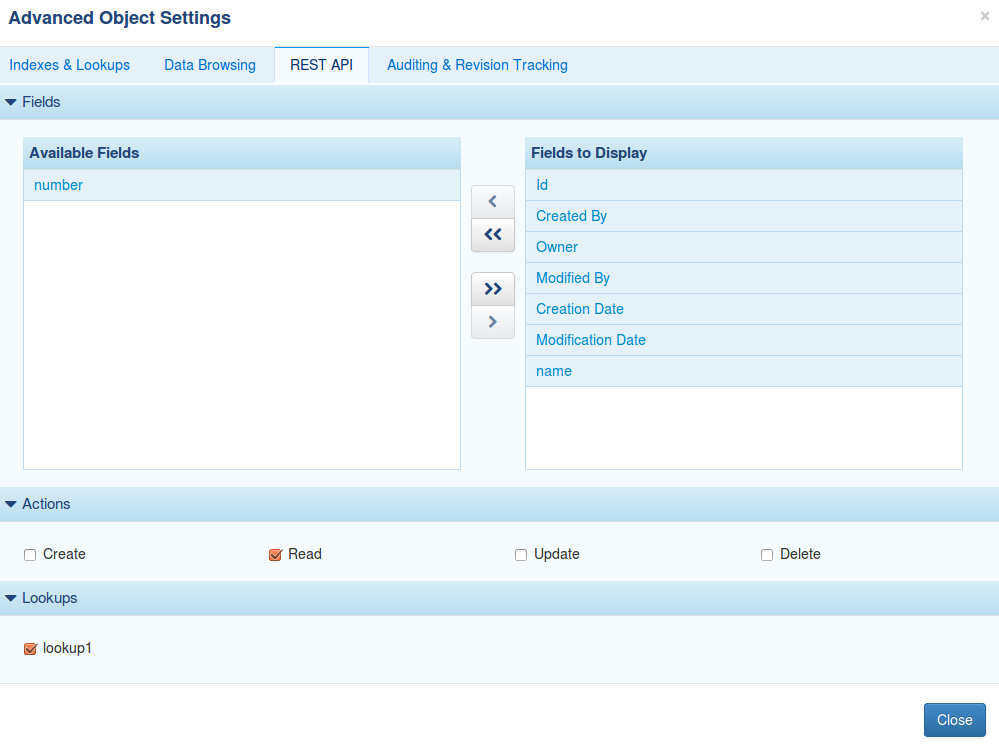
The settings may contain up to three sections:
- The first one, named Fields allows to pick fields that should be exposed via REST. Fields in the table to the right are exposed and fields in the table to the left are not. You can drag and drop fields from one table to another or select them and use provided buttons.
- The next section is named Actions and defines the operations on the instances that are allowed via REST for this entity. By default, no action is allowed. You can choose to change it, by selecting some or all of the actions.
- The last section, called Lookups will appear only if there is at least one lookup defined for an entity. This section allows to pick the lookups that can be executed via REST. Note, that to execute lookups at all, a “Read” action must be enabled.
Changing REST settings through annotations
The REST settings can also be applied using MDS annotations. The three annotations that allow this, are:
- @org.motechproject.mds.annotations.RestIgnore As stated in the previous sections, be default all fields are exposed via REST. You can adjust this behaviour using this annotation. Annotated fields will not be exposed via REST.
- @org.motechproject.mds.annotations.RestOperations Placed on the entity class definition, specifies the REST operations that should be allowed for this entity. The annotation takes an array of org.motechproject.mds.annotations.RestOperation, which is an enum of possible values.
- @org.motechproject.mds.annotations.RestExposed Placed on the lookup method definition, in the service interface. Annotated lookup methods will be marked as exposed via REST. By default, lookups are not exposed via REST.
The code below shows an example usage of the annotations:
@Entity
@RestOperations({RestOperation.CREATE, RestOperation.READ})
public class MyEntity {

    @Field
    @RestIgnore
    private Integer number;

    @Field
    private String emailAddress;

    @Field
    private String message;
}


public interface MyEntityService extends MotechDataService<MyEntity> {

    @Lookup(name = "By number")
    List<MyEntity> findByNumber(@LookupField(name = "number") Integer number);

    @Lookup(name = "By Email Address")
    @RestExposed
    List<MyEntity> findByEmailNumber(@LookupField(name = "emailAddress") String emailAddress);
}
REST documentation
MOTECH provides a user interface that documents and allows the testing of the REST API exposed by MDS. This interface is generated using Swagger. In order to access this UI, first select REST API in the top menu, then Data Services in the sub-menu.
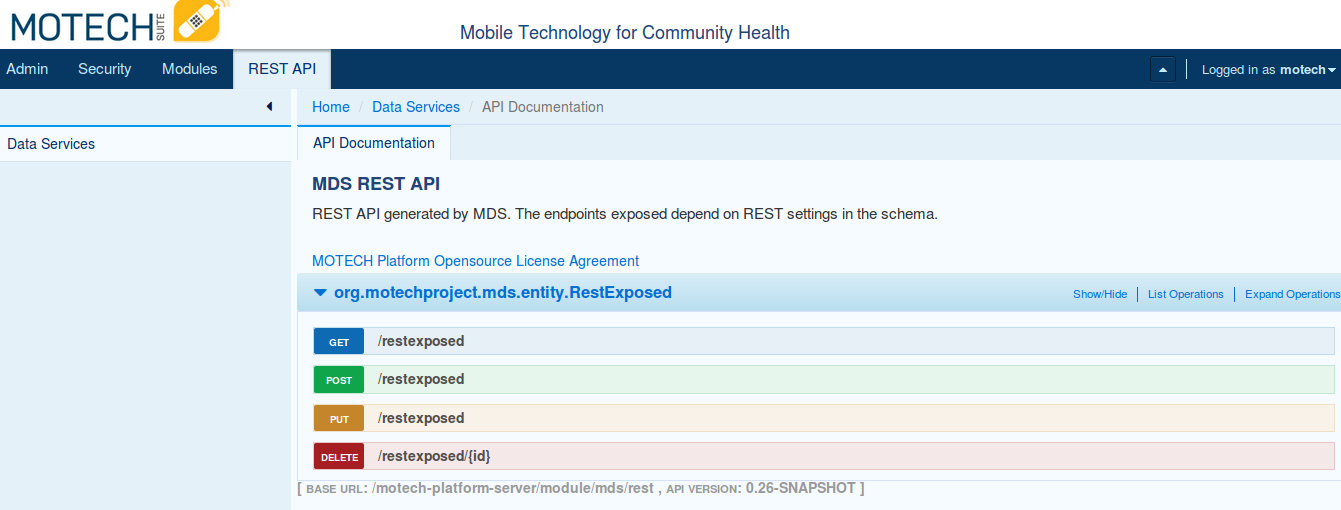
The raw Swagger specification file (JSON format) is accessible at <your_motech_url>/module/mds/rest-doc.
Entity validations
MDS allows to set up validations on the fields of an entity. A validation ensures that values of created instances will match some criteria. The validations are applied on two levels:
- UI - MDS UI will check the values when adding or editing instances and display hints or errors, when the value does not match some of the defined validations.
- Code - Attempting to save an instance that has got invalid values, using the retrieved MotechDataService, will result in a ConstraintViolationException.
Configuring validations through the UI
To set up validations for a field of an entity, open the Schema Editor and select an entity, for which you wish to set validations. Expand the field that should be validated and navigate to the Validation tab.
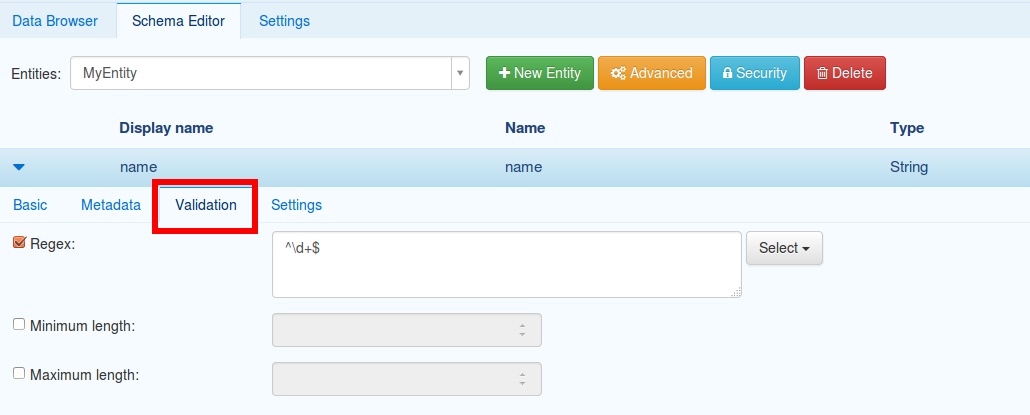
Only some of the MDS types support setting up validations via UI, so if a selected field is of a type that is not supported, the Validation tab will not appear. Please see the list of supported types and validations below.
| Type | Validation | Annotation | Description |
|---|---|---|---|
| String | Regex | @javax.validation.constraints.Pattern | Allows to set up a regular expression. Only strings that match the regex will be accepted. |
| String | Minimum length | @javax.validation.constraints.Size | Defines a minimal number of characters the strings must have. |
| String | Maximum length | @javax.validation.constraints.Size | Defines a number of characters the strings cannot exceed. |
| Integer / Decimal | Minimum value | @javax.validation.constraints.Min @javax.validation.constraints.DecimalMin | Defines a minimal number that will be accepted. |
| Integer / Decimal | Maximum value | @javax.validation.constraints.Max @javax.validation.constraints.DecimalMax | Defines a maximal number that will be accepted. |
| Integer / Decimal | Must be in set | @org.motechproject.mds.annotations.InSet | Only numbers that have been explicitly specified will be accepted. |
| Integer / Decimal | Cannot be in set | @org.motechproject.mds.annotations.NotIn Set | All numbers that have not been explicitly specified will be accepted. |
Note
Setting up validations via UI is only possible for the EUDE.
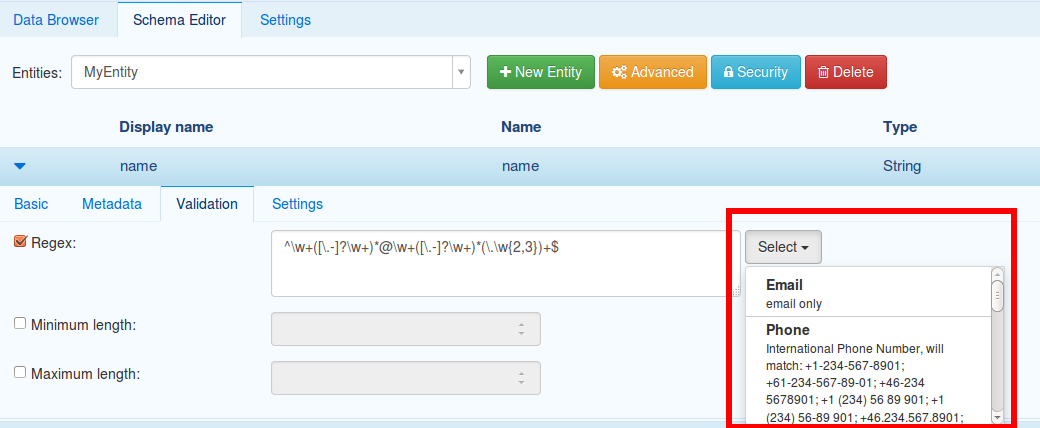
The Regex validation contains some predefined patterns, for the most common use cases. To view them, click Select, next to the Regex input field and pick one of the available, predefined expression. This will automatically, place the regular expression in the input field. Please note, that this operation will erase the current value in the field, if there’s any provided.
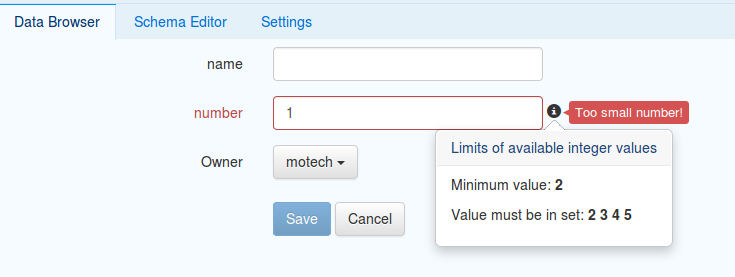
Setting up validations will display hints while adding an instance of an entity, that has got validated fields. An attempt to add an instance with invalid values, will display an error and block the ability to save the instance.
Configuring validations using annotations
For DDEs, it is possible to set up validations using the annotations. MDS will recognize the @javax.validation.constraints annotations, as well as two MDS-defined annotations: @org.motechproject.mds.annotations.InSet and @org.motechproject.mds.annotations.NotInSet. See the code below, for an example of validation definition through annotations.
@Entity
public class MyEntity {

    @Field
    @Min(10)
    @Max(100)
    private Integer number;

    @Field
    @Pattern(regexp = "^\\w+([\\.-]?\\w+)*@\\w+([\\.-]?\\w+)*(\\.\\w{2,3})+$")
    private String emailAddress;

    @Field
    @AssertTrue
    private Boolean alwaysTrue;

    @Field
    @Size(min = 64, max = 2048)
    private String message;
}
Note
When using annotations, take into consideration what field types they can be applied to. Most of the annotations support only one or a few types.
Even though you can use any @javax.validation.constraints annotation on an entity field, the UI support (hints, error messages), will only be displayed for the validations listed in the previous section, about setting validation through UI. Other validations will not show up on the UI, but it still will not be possible to add an invalid value - a ConstraintViolationException will be thrown.
MDS Lookup Service
The org.motechproject.mds.service.MdsLookupService is an OSGi service which allows easy access to executing queries on entities without compile time access to their classes. It can also be useful for executing on entities without knowing the entity name at compile time. An example is the IVR module which exposes this service to velocity templates, allowing users data access.
Note
As with all MDS API, the MdsLookupService uses the underlying MotechDataService for the entity underneath. It is really just a facade for service access.
The service exposes these methods:
public interface MDSLookupService {

    <T> T findOne(Class<T> entityClass, String lookupName, Map<String, ?> lookupParams);
    <T> T findOne(String entityClassName, String lookupName, Map<String, ?> lookupParams);

    <T> List<T> findMany(Class<T> entityClass, String lookupName, Map<String, ?> lookupParams);
    <T> List<T> findMany(String entityClassName, String lookupName, Map<String, ?> lookupParams);
    <T> List<T> findMany(Class<T> entityClass, String lookupName, Map<String, ?> lookupParams,
                         QueryParams queryParams);
    <T> List<T> findMany(String entityClassName, String lookupName, Map<String, ?> lookupParams,
                         QueryParams queryParams);

    <T> List<T> retrieveAll(Class<T> entityClass);
    <T> List<T> retrieveAll(String entityClassName);
    <T> List<T> retrieveAll(Class<T> entityClass, QueryParams queryParams);
    <T> List<T> retrieveAll(String entityClassName, QueryParams queryParams);

    long count(Class entityClass, String lookupName, Map<String, ?> lookupParams);
    long count(String entityClassName, String lookupName, Map<String, ?> lookupParams);

    long countAll(Class entityClass);
    long countAll(String entityClassName);
}
For the examples below assume the following classes:
@Entity
public class Patient {

    @Field
    public String name;

    @Field
    public Integer age;

    @Field
    private Set<Visit> visits;
}
@Entity
public class Visit {

    @Field
    public Integer officeNumber;

    @Field
    public DateTime date;
}
with the following lookups defined in its data service:
public interface PatientService extends MotechDataService<Patient> {

    @Lookup
    Patient byName(@LookupField(name = "name") String name);

    @Lookup
    List<Patient> byAge(@LookupField(name = "age") Integer age);
}
The findOne methods can be used to execute single return lookups given the lookup name, the entity class name(or class object) and map consisting of the lookup params, where the key is the lookup parameter name and the value is the actual parameter. Usage example:
Map<String, ?> params = new HashMap<>();
params.put("name", "John");

// type safe method
Patient patient = mdsLookupService.findOne(Patient.class, "findByName", params);

// alternative method
Patient patient = (Patient) mdsLookupService.findOne("org.motechproject.example.Patient", "findByName", params);
The findMany method can be used to execute multiple result lookups. Additional versions of the method allow executing the lookup with QueryParams, which control/pagination ordering. Usage example:
Map<String, ?> params = new HashMap<>();
params.put("age", 29);

// type safe method
Patient patient = mdsLookupService.findOne(Patient.class, "findByAge", params);

// alternative method
List<Patient> patients = (List<Patient>) mdsLookupService.findOne("org.motechproject.example.Patient", "findByAge", params);

// with QueryParams

// first page, with pages consisting of 10 records
// order by name, descending
QueryParams queryParams = new QueryParams(1, 10, new Order("name", Order.Direction.DESC));

// type safe method
Patient patient = mdsLookupService.findOne(Patient.class, "findByAge", params, queryParams);

// alternative method
List<Patient> patients = (List<Patient>) mdsLookupService.findOne("org.motechproject.example.Patient", "findByAge", params, queryParams);
The retrieveAll methods can be used as above with omission of parameter maps, since instead of using a lookup, it retrieves all records from the database executing retrieveAll on the service.
The count and countAll methods are also no different in terms of usage. The only difference is that they return the number of instances returned by a lookup and the total number of instances respectively.
Lookups on relationship fields can be used like in the example below:
public interface PatientService extends MotechDataService<Patient> {

    @Lookup
    List<Patient> byVisitsDate(@LookupField(name = "visits.date") DateTime date);

    @Lookup
    List<Patient> byVisitsDateAndVisitsOffice(@LookupField(name = "visits.officeNumber") Integer officeNumber
                                              @LookupField(name = "visits.date") Range<DateTime> date);
}
Note
MDS Lookups support only first depth level of relationships.
Executing custom queries
Executing JDO queries
MDS allows developers to use the JDO API offered by DataNucleus to execute any query they wish. A utility method for calling direct SQL queries through DataNucleus. Although the approach of executing custom queries gives the user all the flexibility he needs, the more easier and recommended approach is to use Lookups instead. This API remains in place however in order to fulfil the more complex requirements.
In order the execute a custom JDO query, the developer has to implement the org.motechproject.mds.query.QueryExecution interface and pass an instance of this implementation to the executeQuery(QueryExecution) method. This interface exposes one method - execute(javax.jdo.Query, org.motechproject.mds.util.InstanceSecurityRestriction). The first a parameter is the javax.jdo.Query instance class created using the PersistenceManager for the entity class of the data service being used, the second is an object describing security restrictions on the entity.
What is returned by the interface method will be also returned by the executeQuery() call on the data service. The interface is generic, the type parameter represents the return value.
Following is an example of executing a custom JDO query. Given a simple entity:
@Entity
public class Example {

    public Integer amount;

    public String name;
}
Here is an example of a JDO query that will check the amount value and based on that select only the names from the database:
// get the service for the entity you wish to execute the query on
MotechDataService<Example> service = getService();

QueryExecution<List<String>> queryExecution = new QueryExecution<List<String>>() {
    @Override
    public List<String> execute(Query query, InstanceSecurityRestriction restriction) {
        // return objects with the amount value either less then 1000 or greater then 1000
        query.setFilter("amount < 100 || amount > 1000");

        // select only the name column
        query.setResult("name");

        // limit the results
        query.setRange(0, 100);

        return (List<String>) query.execute();
    }
};

List<String> names = service.executeQuery(queryExecution);
More info on JDO queries can be found here: http://www.datanucleus.org/products/datanucleus/jdo/jdoql.html
Executing SQL queries
Similar to executing JDO queries MDS also provides developers with access to executing SQL queries. Instead of implementing the QueryExecution interface however, developers have to implement the org.motechproject.mds.query.SqlQueryExecution interface. This interface has two methods, execute(javax.jdo.Query) and getSqlQuery(). The contents of the SQL query should be returned by the getSqlQuery methods, so that MDS can construct the JDO query using that SQL.
Following is an example of executing a custom SQL query. Given a simple entity:
@Entity
public class Example {

    public Integer amount;

    public String name;
}
Here is an example of a SQL query that will return values with the given amount:
// there is really no impact on which data service is used, since this is raw sql
MotechDataService<Example> service = getService();

SqlQueryExecution<List<String>> sqlQueryExecution = new SqlQueryExecution<List<String>>() {
    @Override
    public List<String> execute(Query query) {
        // usage of params
        Map<String, Integer> params = new HashMap<>();
        params.put("param", 5);
        return (List<String>) query.executeWithMap(params);
    }

    @Override
    public String getSqlQuery() {
        // this query will be executed by MDS
        return "SELECT name FROM MDS_EXAMPLE WHERE amount = :param";
    }
};

List<String> names = service.executeSQLQuery(sqlQueryExecution);
Note that using raw SQL should be the absolute last resort, it is advised to stick to more high-level concepts in your code.
Using Spring Transactions with MDS
Spring transactions (the @Transactional annotation) can be used inside your MOTECH module with MDS, however this requires some setup inside the module that wishes to use these transactions.
Firstly, Spring annotation driven transactions must be configured in the Spring context. The transaction manager that is used, must be the one exposed by the MDS entities bundle as an OSGi service. Below is a minimal example configuration that defines a reference to the MDS transaction manager and uses it when declaring annotation driven transactions:
<?xml version="1.0" encoding="UTF-8"?>
<beans xmlns="http://www.springframework.org/schema/beans"
       xmlns:xsi="http://www.w3.org/2001/XMLSchema-instance"
       xmlns:osgi="http://www.eclipse.org/gemini/blueprint/schema/blueprint"
       xmlns:tx="http://www.springframework.org/schema/tx"
       xsi:schemaLocation="http://www.springframework.org/schema/beans http://www.springframework.org/schema/beans/spring-beans-3.2.xsd
        http://www.eclipse.org/gemini/blueprint/schema/blueprint http://www.eclipse.org/gemini/blueprint/schema/blueprint/gemini-blueprint.xsd
        http://www.springframework.org/schema/tx http://www.springframework.org/schema/tx/spring-tx-3.2.xsd">

    <tx:annotation-driven transaction-manager="transactionManager"/>

    <osgi:reference id="transactionManager" interface="org.springframework.transaction.PlatformTransactionManager" context-class-loader="unmanaged"/>

</beans>
Note
Setting the context-class-loader to unmanaged will prevent switching the context classlaoder to the incorrect one, since the platform transaction manager is treated as an OSGi proxy itself. This issue can manifest in bundle ITs, where the wrong context classloader can be used, leading to errors about missing metadata.
Thanks to this configuration, Spring transaction annotations should work properly in your module, take note however that you might be required to explicitly import the following packages (example of the bundle plugin configuration):
<Import-Package>
     org.aopalliance.aop,
     org.springframework.aop,
     org.springframework.aop.framework,
     org.springframework.cglib.core,
     org.springframework.cglib.proxy,
     org.springframework.cglib.reflect,
     org.springframework.transaction,
     *
 </Import-Package>
After this you can simply use the @Transactional annotation to mark your methods as transactions. Make sure you are using the correct @Transactional annotation (org.springframework.transaction.annotation.Transactional). Example of a bean using the annotation:
@Component
public class TransactionTestBean {

    @Autowired
    private BookDataService bookDataService;

    @Transactional
    public void addTwoBooks() {
        bookDataService.create(new Book("Book1"));
        bookDataService.create(new Book("Book2"));
    }

    @Transactional
    public void addTwoBooksAndRollback() {
        addTwoBooks();
        // throwing a runtime exception rolls back the entire transaction
        throw new IllegalStateException("Rollback the transaction");
    }
}
More information on Spring transactions can be found here: http://docs.spring.io/spring/docs/current/spring-framework-reference/html/transaction.html
Note
Take note that these annotations will work only with Spring beans.
Security
Access to the Data Services module
MDS registers three permissions, that restrict access to certain parts of the Data Services module via MOTECH UI. They are:
- mdsSchemaAccess (grants access to the Schema Editor)
- mdsDataAccess (grants access to the Data Browser)
- mdsSettingsAccess (grants access to the Settings panel)
The MDS Admin role contains all of these three permissions.
Access to the instances
Depending on the chosen option, two security levels can be recognised in MDS:
| Security level | Description |
|---|---|
| Instance | Defines access to certain instances of an entity. Only permitted users will be able to see the instance and perform any CRUD operations on it. |
| Non-instance | Defines access to all the instances of an entity. Only permitted users will be able to see the link to the instances table and perform CRUD operations on them. |
Security settings can be set through the UI or by the @org.motechproject.mds.annotations.Access annotation for DDE. It works only with the @Entity annotation.
There are five security modes:
| Option | Security level | Description |
|---|---|---|
| EVERYONE | None | The access to the instances is not limited in any way. |
| OWNER | Instance | Only the user that has been selected as an owner of the instance has got access. An owner can be selected while adding/editing instance. |
| CREATOR | Instance | Only the user that has created the instance has got access and can perform CRUD operations on it. |
| USERS | Non-instance | An additional input field will appear, where a list of permitted users should be placed. Permitted users will be able to view and perform CRUD operations on all instances of an entity. |
| ROLES | Non-instance | Similar to Users - an additional input field will appear, where a list of roles should be placed. Users that have got any of the permitted roles, will be able to view and perform CRUD operations on all instances of an entity. |
The code below shows an example usage of the annotation:
@Entity
@Access(value = SecurityMode.ROLES, members = {"admin"})
public class MyEntity { }
To update security settings via UI, pick the entity and click the Security button.
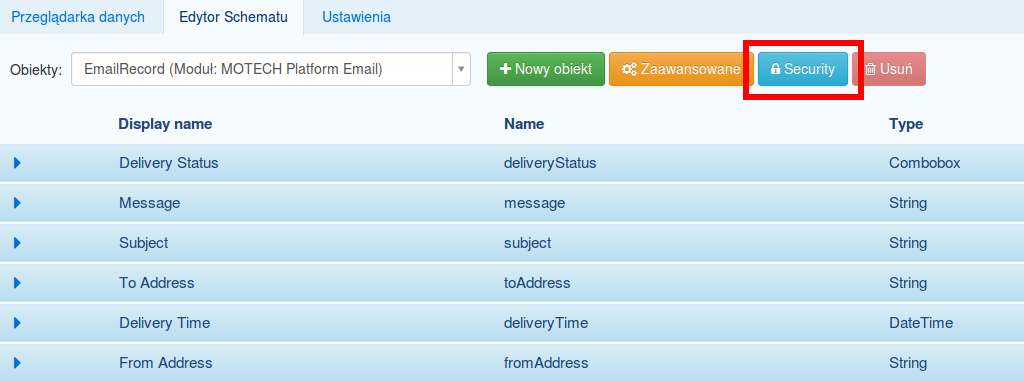
A new modal window will appear, where security settings can be updated.
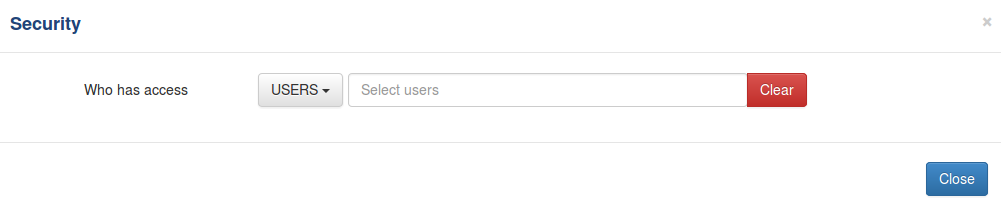
Note
The security settings are applied to all means of access to the instances. It does not matter if an access is attempted via UI, through the code or REST - the necessary permissions will always be checked. This also means that it is possible to disallow the application itself to access the instances, so be careful when restricting access to the MOTECH entities.
CRUD Events
By default, MDS sends CRUD events after a Create/Update/Delete operation is completed, which can be optionally disabled through the UI or by the @org.motechproject.mds.annotations.CrudEvents annotation for DDE. It works only with the @Entity annotation.
The annotation has five options:
| Option | Description |
|---|---|
| CREATE | Enable MDS to send events during creating instances of an entity. |
| UPDATE | Enable MDS to send events during updating instances of an entity |
| DELETE | Enable MDS to send events during deleting instances of an entity |
| ALL | Enable MDS to send events during creating, updating and deleting instances of an entity |
| NONE | None of the CRUD events will be sent by MDS |
The code below shows an example usage of the annotation:
@Entity
@CrudEvents(CrudEventType.CREATE)
public class MyEntity {

    @Field
    private String message;
}
Note
Of course you can mix options (for example using CREATE and UPDATE).
To turn off sending events for an EUDE you have to disable the feature in the Advanced settings, ‘Auditing & Revision Tracking’ section. You can also do the same for a DDE. After changes are made, a flag modifiedByUser will be set to true, which means for a DDE, that the crud event settings will not be reloaded from the annotation upon restart.

The subject of MDS CRUD events takes the form of “mds.crud.<module name>.<namespace>.<entity name>.<action i.e. UPDATE|DELETE|CREATE>”. The event payload contains 5 parameters:
- object_id - the ID of the object this event refers to
- entity_name - the name of the entity
- entity_class - the fully qualified class name of the entity
- module_name - the name of the module from which the entity comes from (optional)
- namespace - the namespace of the entity (optional)
A separate event is also fired once a CSV import is completed. The subject of the event is similar to a regular CRUD event and takes the form of “mds.crud.<module name>.<namespace>.<entity name>.csv-import.<success|failure>”.
The payload for a CSV import success event contains the following parameters:
- entity_name - the name of the entity for which this import was performed
- entity_class - the fully qualified class name of the entity for which this import was performed
- module_name - the name of the module from which the entity comes from (optional)
- namespace - the namespace of the entity for which this import was performed (optional)
- csv-import.filename - the name of the imported file
- csv-import.created_ids - a list of IDs for instances newly created during import
- csv-import.updated_ids - a list of IDs for instances updated during import
- csv-import.created_count - the count of instances newly created during import
- csv-import.updated_count - the count of instances updated during import
- csv-import.total_count - total count of instances created/updated by this import(sum of the created count and updated count)
The payload for the import failure event is different:
- entity_name - the name of the entity for which this import was performed
- entity_class - the fully qualified class name of the entity for which this import was performed
- module_name - the name of the module from which the entity comes from (optional)
- namespace - the namespace of the entity for which this import was performed (optional)
- csv-import.filename - the name of the imported file
- csv-import.failure_message - the message from the exception that caused the failure
- csv-import.failure_stacktrace - the stacktrace of the exception that caused the failure(as String)
Tasks integration
For the entities that expose these events, you can create tasks with these events as a trigger. To do it go to the Task module, click ‘New task’ and you should see the Data Services trigger list. A trigger is exposed for every crud event per entity:
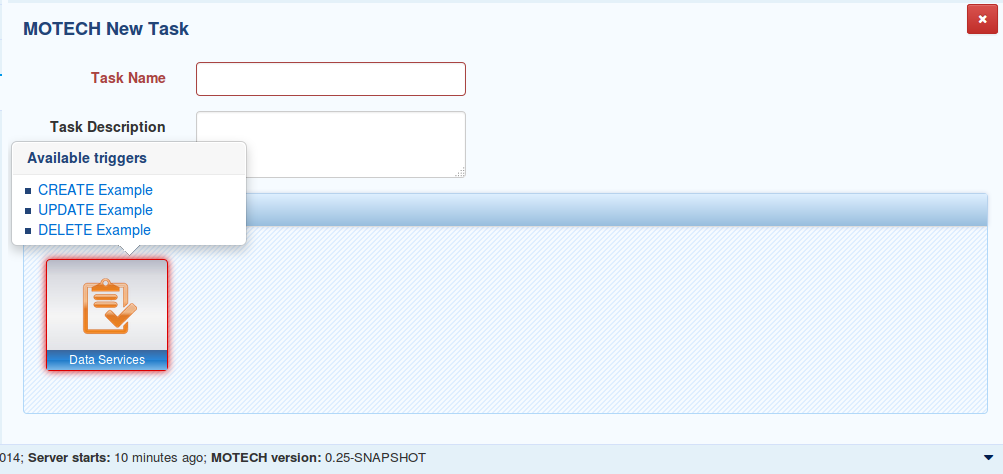
In the Task module, you can also use Data Services as a channel and select an action you want :

Instance Lifecycle Listeners
In MDS you can register listeners for persistence events. You can provide listener to receive events for CREATE, DELETE, LOAD, and STORE of objects. To do this you have to use the @org.motechproject.mds.annotations.InstanceLifecycleListener annotation on service methods.
The annotation value is an array of one or more values :
| Option | Description |
|---|---|
| POST_CREATE | Invoked after an instance is made persistent. |
| PRE_DELETE | Invoked before a persistent instance is deleted. Access to field values within this call are permitted. |
| POST_DELETE | Invoked after a persistent instance is deleted. This method is called after the instance transitions to persistent-deleted. Access to field values is not permitted. |
| POST_LOAD | Invoked after a persistent instance is loaded from the data store. |
| PRE_STORE | Invoked before a persistent instance is stored, for example during committing a transaction. |
| POST_STORE | Invoked after a persistent instance is stored. It is called after the field values have been stored. |
Note
The listener is called within the same transaction as the operation being reported and so any changes they then make to the objects in question will be reflected in that objects state. Throwing a RuntimeException from a listener will fail the transaction.
The code below shows an example usage of the annotation:
public interface MyService {

    @InstanceLifecycleListener(InstanceLifecycleListenerType.POST_CREATE)
    void changeSubject(EmailRecord emailRecord);

    @InstanceLifecycleListener(InstanceLifecycleListenerType.POST_STORE, packageName = "org.motechproject.example")
    void entityChanged(Object o);
}

@Service("myService")
public class MyServiceImpl implements MyService {

    public void changeSubject(EmailRecord emailRecord) {
        emailRecord.setSubject("newSubject");
    }

    public void entityChanged(Object o) {
        // process the entity
    }
}
<?xml version="1.0" encoding="UTF-8"?>
<beans xmlns="http://www.springframework.org/schema/beans"
    xmlns:xsi="http://www.w3.org/2001/XMLSchema-instance"
    xmlns:osgi="http://www.eclipse.org/gemini/blueprint/schema/blueprint"
    xsi:schemaLocation="http://www.springframework.org/schema/beans
        http://www.springframework.org/schema/beans/spring-beans.xsd
        http://www.eclipse.org/gemini/blueprint/schema/blueprint
        http://www.eclipse.org/gemini/blueprint/schema/blueprint/gemini-blueprint.xsd">

    <osgi:service ref="myService" interface="org.motechproject.example.MyService"/>

</beans>
Note
If you want you can mix options (for example using POST_CREATE and POST_STORE).
You have to remember about the following when using InstanceLifecycleListeners :
- Methods annotated with @org.motechproject.mds.annotations.InstanceLifecycleListener must be in services exposed by OSGi
- Methods must have exactly one parameter and its type must be either a persistable class or java.lang.Object if the package is specified.
- You can annotate multiple methods for one type of event
The annotated method is a listener for class defined in the parameter type (in our example for EmailRecord).
Entities Migrations
In MDS you can use flyway migrations. These migrations will run after entities schema generation. MOTECH will automatically
copy migration files from installed modules to the .motech directory. Files should be placed in db/migration/default
directory(if you are using mysql then use mysql instead default) in the bundle. Each file muse have
a proper name <http://flywaydb.org/documentation/migration/sql.html>`_(e.g. :code:`V1__Description.sql).
Schema Import/Export
This section explains how to import and export MDS Schema. It can be done with only a few steps using the MDS module UI.
Schema Import
The first thing you need to do is to enter Import tab under the Settings.
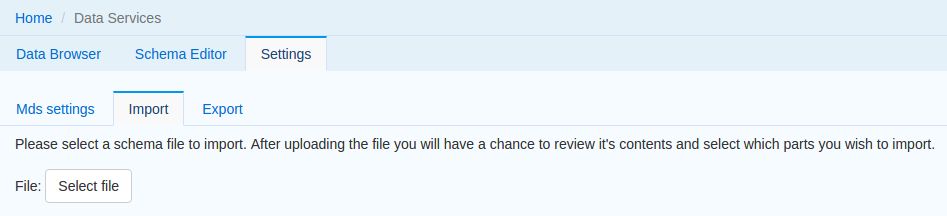
Once in the Import tab, you will have to click the “Select file” button and choose the file you want to import the schema from. It must be a valid JSON file that contains a valid schema definition, otherwise an error will occur while parsing it.
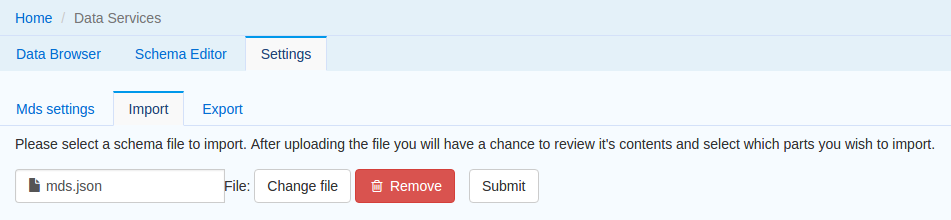
Here, all you have to do is to click the Submit button. MDS will now parse the JSON file and display entities for review on the following screen.
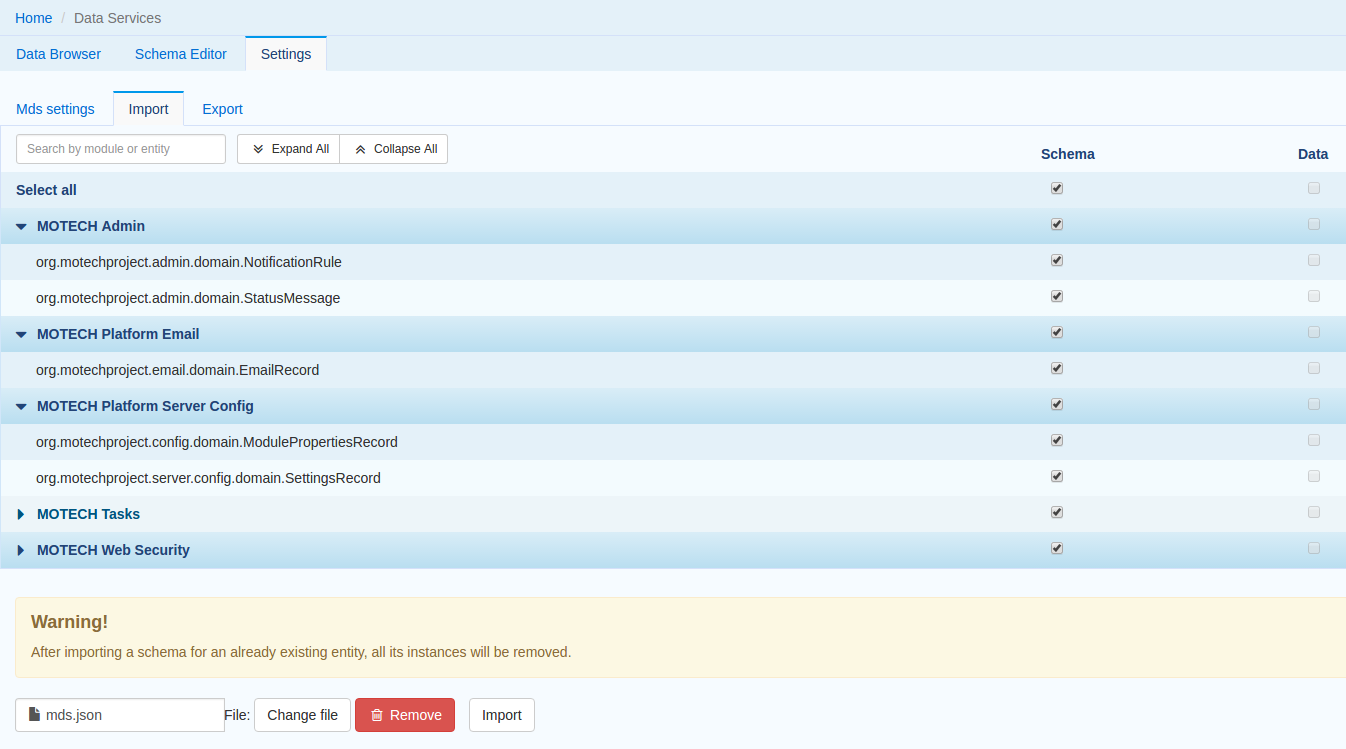
Now you can select which entities you want to import. You can achieve this by simply ticking or unticking the checkboxes next to the entity or module name in the Schema column. Ticking the checkbox next to the module name will result in importing all the entities originating from that module, while ticking the checkbox next to the entity name will result in importing only that entity. If the given JSON contains instances of the entities you are importing schema for, you can also import them by ticking the checkboxes next to the entity or module name in the data column. Once you have selected all the entities you want to import schema and/or instances for, simply click the Import button. Keep in mind that importing schema for entities that already exist will result in removing data related to those entities. Two entities are considered equal if they have the same class name. For information on how relationships are handled please visit the Relationship handling section.
Schema Export
The first thing you need to do is to enter Export tab under the Settings.
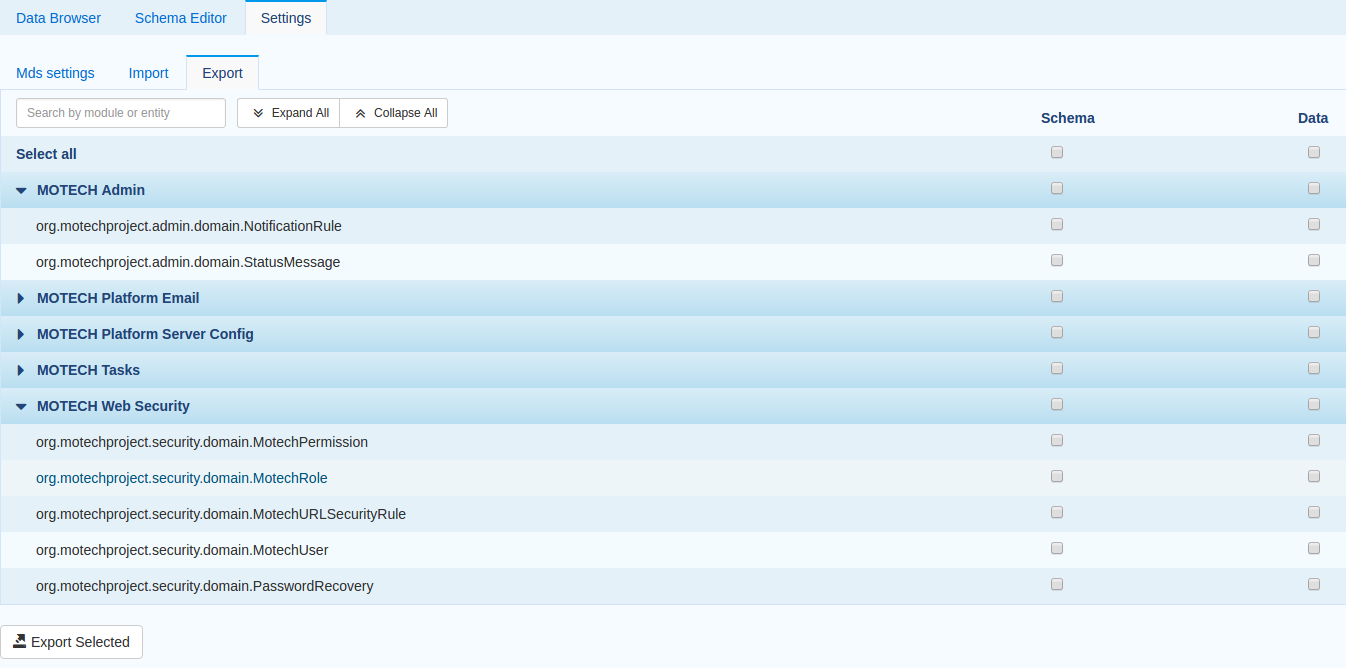
Now you can select which entities you want to export. You can achieve this by simply ticking or unticking the checkboxes next to the entity or module name in the Schema column. Ticking the checkbox next to the module name will result in exporting all the entities originating from that module, while ticking the checkbox next to the entity name will result in exporting only that entity. You can also export the instances of each of the entities. To achieve this simply tick the checkbox next to the entity or module name in the Data column. Once you have selected all the entities you want to export schema and/or instances for, simply click the Export Selected button. This will generate the JSON file that you can save under the location of your choice. Keep in mind that you can’t export instances of certain entities without exporting their schema. For information on how relationships are handled please visi the Relationship handling section.
Relationship handling
There are a few things related to the relationships that you need to remember about during schema export. If there is a relation between two entities both of them must be exported. Also, if you want to export instances of an entity that has relationship with other one you may want to export instances of the second entity as well. If you don’t do this the fields pointing to the other entity will be set to null and may potentially break the database integrity if the field is required.
Javadoc
org.motechproject.mds.annotations
/org/motechproject/mds/builder/package-index
/org/motechproject/mds/enhancer/package-index
/org/motechproject/mds/ex/package-index
org.motechproject.mds.repository
/org/motechproject/mds/web/package-index