Using the Tasks Module
Table of Contents
Introduction
The Tasks module, as its name suggests, provides an ability to define and execute tasks. In MOTECH world, task is a piece of work (called action) that has to be performed in response to some event (trigger). In other words, the module provides a tool for defining simple logic that is ready to use without writing a single line of code.
The main features of the Tasks module include:
- Creating, managing and executing tasks
- Monitoring tasks execution
- Registering custom triggers, actions and data providers
Basic concepts
Channels
A channel contains information about all exposed triggers and actions within a given module. It can be considered as a module specific configuration that tells the Tasks module how it can make a use of it.
The most important elements of the channel are trigger and action definitions. In fact, if channel does not define neither triggers nor actions it is considered invalid. Other properties includes the channel display name, that will be visible on the Tasks UI (it may be a key from message.properties, in which case it will appear as a translated message). Module version and name are obtained at channel registration from the registering bundle. Additionally the channel may contain a short description.
Detailed definition:
| Field | Attributes | Description |
|---|---|---|
| displayName | required | A channel name that will be displayed on the UI (may be an i18n key) |
| moduleName | required, derived | A name of the module that registered the channel. By default derived from the bundle information |
| moduleVersion | required, derived | A version of the module that registered the channel. By default derived from the bundle information |
| description | optional | A brief channel description that will be displayed on the UI (may be an i18n key) |
| triggerTaskEvents | optional | An array of triggers definitions |
| actionTaskEvents | optional | An array of actions definitions |
Triggers
A trigger represents a precise definition of events exposed by module. In tasks, a trigger is something that, as the name suggests, triggers task executions. This means that when an event described by the trigger is published, all tasks with that trigger will get executed. Every trigger has an unique name and, in a simple case, corresponds to exactly one event. Parameters of this event are defined within the trigger. Each parameter contains its name (key) and type.
A good example of a trigger can be an inbound SMS. It would contain the following parameters: message (STRING), sender (STRING), recipients (LIST) etc. Those information will be accessible in the Tasks module.
In the basic case, the most important elements of a trigger are subject and event parameters. The subject corresponds to the event subject that is wrapped by this trigger, while event parameters are the parameters that will be exposed by the trigger. Providing this basic kind of the trigger makes Tasks module listen to the event with the given subject. Each time such an event is published, all active tasks with a corresponding trigger are executed.
However, in some cases the basic behaviour is not sufficient. Sometimes we want the event to correspond to many triggers. In this situation, the trigger listener subject comes in handy. It has to be used along with a custom event parser, which is a little more advanced component, thus it will be described later.
Detailed trigger definition:
| Field | Attributes | Description |
|---|---|---|
| displayName | required | Trigger name that will be displayed on the UI (may be an i18n key) |
| subject | required | Trigger subject that will be delivered to the task |
| triggerListenerSubject | optional | Real event subject that is wrapped by this trigger. In a simple case it is identical to the subject above, so it can be omitted. |
| description | optional | A brief trigger description that will be displayed on the UI (may be an i18n key) |
| eventParameters | optional | An array of event parameters described below |
Detailed trigger event parameter definition:
| Field | Attributes | Description |
|---|---|---|
| displayName | required | Event parameter name that will be displayed on the UI (may be an i18n key) |
| eventKey | required, unique | Event parameter key. The event parameter value will be obtained from delivered event using this key |
| type | optional | Type of the delivered event parameter. Default is UNICODE |
Actions
An action represents a definition of function that can be called in a response to a trigger. Every action can represent either a single method of an OSGi service that will be called or an event that will be sent. Each parameter contains it name (key), type and may contain its default value. In case of a method call, the way in which parameters will be passed may vary depending on the needs. They can be either passed directly to the method (matching its signature) or using a key-value pair map.
For instance, an action may correspond to sending an email message. That action would then contain some required fields such as recipients (as a LIST) and the message (STRING) and some optional fields, for example the delivery time (DATE).
As mentioned before, there are two forms in which an action can be represented. The first one is an event. In this case, the action must define a subject of that event. Action execution leads to creating an event with the defined subject and parameters that correspond to the exposed action parameters. The second form that action can take is a service method call. In that case, the action definition must contain the name of the OSGi exposed service interface and the method name to execute. Additionally, one can specify the way in which the method will be called. When it is specified as ‘named parameters’, the action parameters will be evaluated, casted and passed directly to the service method according to its signature and matching its parameter names. In the other case, when it is specified as ‘map’, the parameters are evaluated, packed into a hash map and passed to the method. In this situation the service method is supposed to take exactly one parameter of type java.util.Map<java.lang.String, java.lang.Object>.
An action is considered invalid if it does not define the method nor the event. However, it can define both of them, but the method call has the precedence before event passing. Thus event is send only if the method defining service is not available.
Detailed action definition:
| Field | Attributes | Description |
|---|---|---|
| name | optional, unique | Action name |
| displayName | required | Action name that will be displayed on the UI (may be an i18n key) |
| description | optional | A brief action description that will be displayed on the UI (may be an i18n key) |
| subject | optional event-required | A subject of the event that is to be sent |
| serviceInterface | optional, method-required | A service containing a method that is to be called |
| serviceMethod | optional method-required | A service method that is to be called |
| serviceMethodCallManner | optional method-optional | A service method call manner. It can take one of two values: NAMED_PARAMETERS (default) - action parameters are passed to the function directly, matching its signature; MAP - action parameters are passed to the method as a map in which keys correspond to parameter names and values correspond to parameter values |
| actionParameters | optional | An array of action parameter definitions described below |
Detailed action parameter definition:
| Field | Attributes | Description |
|---|---|---|
| displayName | required | Action parameter name that will be displayed on the UI (may be an i18n key) |
| key | required, unique | Action parameter key. Depending on action method call manner it will correspond either to a method parameter name or a map key |
| value | optional | Action parameter default value. Depending on action method call manner it will correspond either to a method parameter value or a map value |
| type | optional | Type of the action parameter value. Default is UNICODE |
| required | optional | Indicates if this action parameter is mandatory. May be true or false. Default is false |
| hidden | optional | Indicates if this action parameter should not be visible on the UI. May be true or false. Default is false |
| order | optional | Specifies position at which this action parameter should appear among other parameters |
Parameters types
Available types that can be used with action parameters and trigger event parameters in the Tasks module are listed below.
| Type Name | Java Type | Description |
|---|---|---|
| UNICODE | java.lang.String | Short Unicode string |
| TEXTAREA | java.lang.String | Long Unicode string |
| INTEGER | java.lang.Integer | Signed number without a fraction component |
| LONG | java.lang.Long | Large signed number without a fraction component |
| DOUBLE | java.lang.Double | Double precision floating point number |
| DATE | org.joda.time.DateTime | Calendar date with time |
| TIME | org.joda.time.DateTime | Calendar time without date |
| PERIOD | org.joda.time.Period | Period of time |
| BOOLEAN | java.lang.Boolean | True or false |
| LIST | java.util.List | Collection of values |
| MAP | java.util.Map | Collection of key-value pairs |
Data providers
A data provider can be considered as a source of various data that can be used in a task. It defines the structure of objects it supports as well as structure of the queries that it can perform. Each data provider is recognized by its name.
An example data provider is the one defined by the CMSLite module. It provides two types of objects: StreamContent and StringContent. For instance, StringContent objects contains several fields that can be used in the Tasks module. Those are value, language, name and metadata. It also contains two lookups. One of them is used to find a desired instance by id, the other one uses name and language fields.
Every data provider must implement the DataProvider interface. It contains a few methods responsible for retrieving the data provider name, performing a search, discriminating if a provided type is supported by this provider and finally, returning the provider JSON definition. The definition is in fact a TaskDataProvider object, thus it must follow its schema.
Detailed task data provider definition:
| Field | Attributes | Description |
|---|---|---|
| name | required, unique | An unique data provider name |
| objects | required | An array of task data provider objects |
Detailed task data provider object definition:
| Field | Attributes | Description |
|---|---|---|
| displayName | required | Task data provider object name that will be displayed on the UI (may be an i18n key) |
| type | required, unique | The symbolic type name of the object backed by this task data provider object. As it will be used to distinguish this object from other objects within this data provider, it has to be unique |
| lookupFields | required | An array of lookup field parameters definitions used to in the lookup |
| fields | required | An array of fields parameters definitions available from this task data provider object |
Detailed lookup field parameter definition:
| Field | Attributes | Description |
|---|---|---|
| displayName | required | Lookup field parameter name that will be displayed on the UI (may be an i18n key) |
| fields | required | An array of field names required by this lookup |
Detailed field parameter definition:
| Field | Attributes | Description |
|---|---|---|
| displayName | required | Field parameter name that will be displayed on the UI (may be an i18n key) |
| fieldKey | required | A key used to identify this parameter |
| type | optional | Type of the field parameter value. Default is UNICODE |
Channel registration
To expose a module actions or triggers in Tasks module, a channel containing their definitions has to be registered in the Tasks module. It can be done in one of three different ways: using a static channel definition file, task annotations or programmatically, utilizing the ChannelService.
Using the channel file
It is the most common way to register a task channel. It comes down to creating a json channel definition file named task-channel.json and placing it right in the classpath root of your bundle. It will be automatically discovered by the Tasks module at your bundle start or update.
The file content, written in JSON format, has to follow a well defined structure. The root element must be a channel object that matches a specification defined above.
Example channel file:
{
    "displayName": "sms",
    "triggerTaskEvents": [
        {
            "displayName": "sms.inbound_sms",
            "subject": "inbound_sms",
            "serviceInterface": "org.project.service.SmsService",
            "serviceMethod": "sendSms",
            "eventParameters": [
                {
                    "displayName": "sms.message",
                    "eventKey": "message"
                },
                {
                    "displayName": "sms.sender",
                    "eventKey": "sender"
                },
                {
                    "displayName": "sms.recipient",
                    "eventKey": "recipient"
                },
                {
                    "displayName": "sms.datetime",
                    "eventKey": "datetime",
                    "type": "DATE"
                }
            ]
        }
    ],
    "actionTaskEvents": [
        {
            "displayName" : "sms.send_sms",
            "subject" : "send_sms",
            "actionParameters" : [
                {
                    "displayName" : "sms.message",
                    "key" : "message"
                },
                {
                    "displayName" : "sms.recipients",
                    "key" : "recipients",
                    "type" : "LIST"
                },
                {
                    "displayName" : "sms.delivery_time",
                    "key" : "delivery_time",
                    "type" : "DATE",
                    "required": false
                }
            ]
        }
    ]
}
Note
The order of the elements in the action parameters array determines their order on the Tasks UI, unless an order parameter is specified.
Using annotations
This method allows to register a channel using the Tasks annotation processing mechanism and annotations from org.motechproject.tasks.annotations package. However, this approach is limited to registering actions only. In this scenario, channels correspond to classes and actions to their methods. To make a class recognized as a channel by the Tasks module, it has to be annotated with @TaskChannel. Channel display name can be provided as an annotation parameter. Additionally, module name and version have to be provided as annotation parameters.
Each channel class should have at least one method marked as @TaskAction. For this annotation as well, one can specify the action display name. Each parameter of the action method is considered as an action parameter with default properties: the parameter are marked as required, its type is set to UNICODE and its display name and key corresponds to the action method parameter name. Those default properties can be modified utilising the @TaskActionParam annotation.
Example channel class:
@Service
@TaskChannel(channelName = "sms", moduleName = "sms", moduleVersion = "1.0")
public class SmsServiceImpl implements SmsService {

    @TaskAction
    public void sendSms(
        @TaskActionParam(displayName = "sms.message", key = "message") String message,
        @TaskActionParam(displayName = "sms.recipients", key = "recipients", type = ParameterType.LIST) List recipients,
        @TaskActionParam(displayName = "sms.delivery_time", key = "delivery_time", type = ParameterType.DATE) DateTime deliveryTime
        ) {

        ...
    }

}
Using the ChannelService
The most elastic way to register a channel is to use the ChannelService. It allows to register both triggers and actions in a dynamic manner. The first step of typical usage of the ChannelService is to build a ChannelRequest object. The ChannelRequest is the Java representation of a channel, that follows already defined channel specification. Accordingly, TriggerEventRequest and EventParameterRequest corresponds to trigger and trigger event parameters and ActionEventRequest and ActionParameterRequest corresponds to action and action parameters. Note that in this scenario module name and module version must be provided manually as proper fields of the request. Once the ChannelRequest is ready, it can be passed to the ChannelService method called registerChannel. It will validate the request and register the tasks channel.
Example channel registration using the ChannelService:
@Component
public class SmsChannelRegistration {

    @Autowired
    private ChannelService channelService;

    ...

    private void registerSmsChannel() {

        EventParameterRequest inboundSmsMessage = new EventParameterRequest(
            "message", // event key
            "sms.message" // display name
        );

        EventParameterRequest inboundSmsSender = new EventParameterRequest(
            "sender", // event key
            "sms.sender" // display name
        );

        EventParameterRequest inboundSmsRecipient = new EventParameterRequest(
            "recipient", // event key
            "sms.recipient" // display name
        );

        EventParameterRequest inboundSmsDatetime = new EventParameterRequest(
            "datetime", // event key
            "sms.datetime", // display name
            "DATE" // type
        );

        TriggerEventRequest inboundSmsTrigger = new TriggerEventRequest(
            "sms.inbound_sms", // display name
            "inbound_sms", // subject
            null, // description
            Arrays.asList(inboundSmsMessage, inboundSmsSender, inboundSmsRecipient, inboundSmsDatetime) // event parameters
        );

        ActionParameterRequest sendSmsMessage = new ActionParameterRequest(
            "message", // key
            null, // default value
            "sms.message", // display name
            0, // order
            null, // type (default: UNICODE)
            true, // required
            false // hidden
        );

        ActionParameterRequest sendSms = new ActionParameterRequest(
            "recipients", // key
            null, // default value
            "sms.recipients", // display name
            1, // order
            "LIST", // type (default: UNICODE)
            true, // required
            false // hidden
        );

        ActionParameterRequest sendSms = new ActionParameterRequest(
            "delivery_time", // key
            null, // default value
            "sms.delivery_time", // display name
            2, // order
            "DATE", // type (default: UNICODE)
            false, // required
            false // hidden
        );

        ActionEventRequest sendSmsAction = new ActionEventRequest(
            null, // name
            "sms.send_sms", // display name
            "send_sms", // subject
            null, // description
            "org.project.service.SmsService", // service interface
            "sendSms", // service method
            null, // service method call manner (default: NAMED_PARAMETERS)
            Arrays.asList(sendSmsMessage, sendSmsRecipients, sendSmsDeliveryTime) // action parameters
        );

        ChannelRequest smsChannel = new ChannelRequest(
            "sms", // display name
            "sms", // module name
            "1.0", // module version
            null, // description
            Arrays.asList(inboundSmsTrigger), // trigger requests
            Arrays.asList(sendSmsAction) // action requests
        );

        channelService.registerChannel(smsChannel);
    }
}
Data provider registration
To register a custom data provider, two things have to be done. As it was said before, every data provider has to implement the DataProvider interface. For your convenience we provide an abstract base class that implements the DataProvider interface and removes the requirement to write needles boilerplate. That class is called AbstractDataProvider and is extend by most of our data providers. Usually, this class is used along with a JSON data provider definition stored somewhere in the classpath. The only thing to do then is to provide the string or resource containing the JSON. Once the data provider is ready to use, it is time to actually register it in the Tasks module, which comes down to publishing it as an OSGi service.
Example data provider:
@Service
public class ExternalPatientDataProvider extents AbstractDataProvider {

    @Autowired
    public ExternalPatientDataProvider(ResourceLoader resourceLoader) {
        setBody(resourceLoader.getResource("task-data-provider.json"));
    }

    @Override
    public String getName() {
        return "external-patient";
    }

    @Override
    public Object lookup(String type, String lookupName, Map<String, String> lookupFields) {
        if (supports(type) && lookupFields.containsKey("id")) {
            String id = lookupFields.get("id");
            return getExternalPatient(id);
        } else {
            return null;
        }
    }

    @Override
    public List<Class<?>> getSupportClasses() {
        return Arrays.asList(ExternalPatient.class);
    }

    @Override
    public String getPackageRoot() {
        return "org.project.domain";
    }

    private ExternalPatient getExternalPatient(String id) {

        ...
    }
}
{
    "name": "external-patient",
    "objects": [
        {
            "displayName": ext.external_patient,
            "type": "ExternalPatient",
            "lookupFields": [
                {
                    "displayName": "ext.lookup.id",
                    "fields": [
                        "id"
                    ]
                }
            ],
            "fields": [
                {
                    "displayName": "ext.field.firstName",
                    "fieldKey": "firstName"
                },
                {
                    "displayName": "ext.field.secondName",
                    "fieldKey": "secondName"
                }
            ]
        }
    ]
}
Custom event parser
As it was mentioned earlier, there also exists a more advanced way to handle a trigger, by using a custom event parser. It allows to change the real event subject and parameters to a form in which they will be represented in the task trigger. In other words, it converts an event model to a tasks model.
An example of custom event parser usage can be found in the Commcare module. Once the form-received event occurs, the parser transforms the event payload containing a generic representation of the form xml to a trigger definition based on the schema of the concrete form, giving end-users intuitive access to the fields of that form.
To use a custom event parser, one has to implement TasksEventParser interface and expose it as an OSGi service. To make a use of the custom parser, the incoming event should contain a parameter with ‘org.motechproject.tasks.custom_event_parser’ as a key and the parser name returned by the getName() method as a value.
Example event parser:
@Service
public class FormsEventParser implements TasksEventParser {

    @Override
    public Map<String, Object> parseEventParameters(String subject, Map<String, Object> parameters) {
        Map<String, Object> parsedParameters = new HashMap<>();
        Map<String, Object> dataParameters = (Map<String, Object>) parameters.get("data");
        for (Map.Entry<String, Object> entry : dataParameters.entries()) {
            parsedParameters.put("data/".concat(entry.getKey()), entry.getValue());
        }
        return parsedParameters;
    }

    @Override
    public String parseEventSubject(String subject, Map<String, Object> parameters) {
        String formName = (String) parameters.get("name");
        return subject.concat(".").concat(formName);
    }

    @Override
    public String getName() {
        return "org.project.forms-event-parser";
    }
}
Tasks UI
An important part of the Tasks module is the Tasks UI. It is used to create, edit, manage and monitor tasks.
Overview
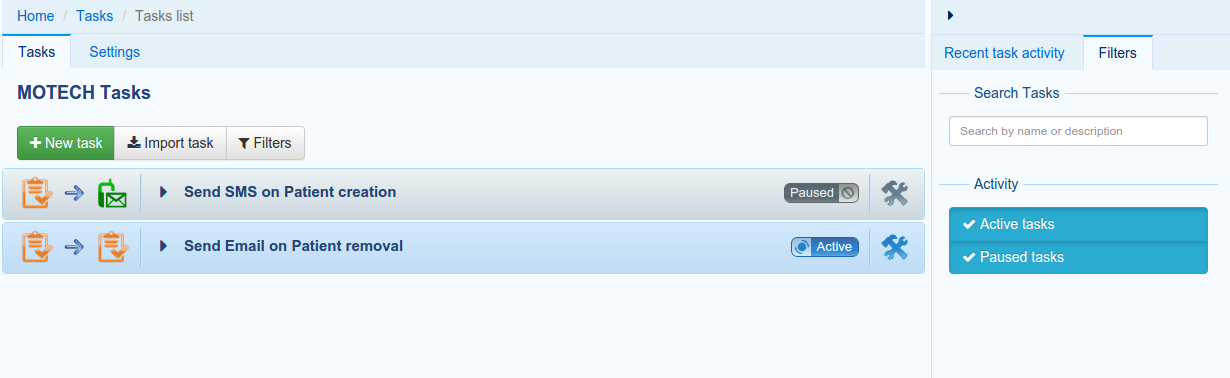
The main Tasks view contains a few elements. Firstly, the action buttons are on the top. They allow creating tasks, importing previously exported tasks and toggling the visibility of the filter view on the right.
The main view lists all currently existing tasks in the form of expandable boxes, that provide actions related to the tasks they represent. The list can be filtered using filters tab mentioned before. One can search the tasks by their name or description as well as be their state (active/paused).

The right panel, besides filters, contains also a recent task activity tab. It provides an instant overview of latest task executions and their results.
Creating a task
New task creation process begins with clicking the ‘New task’ button on the main view. The task creation view shows up.
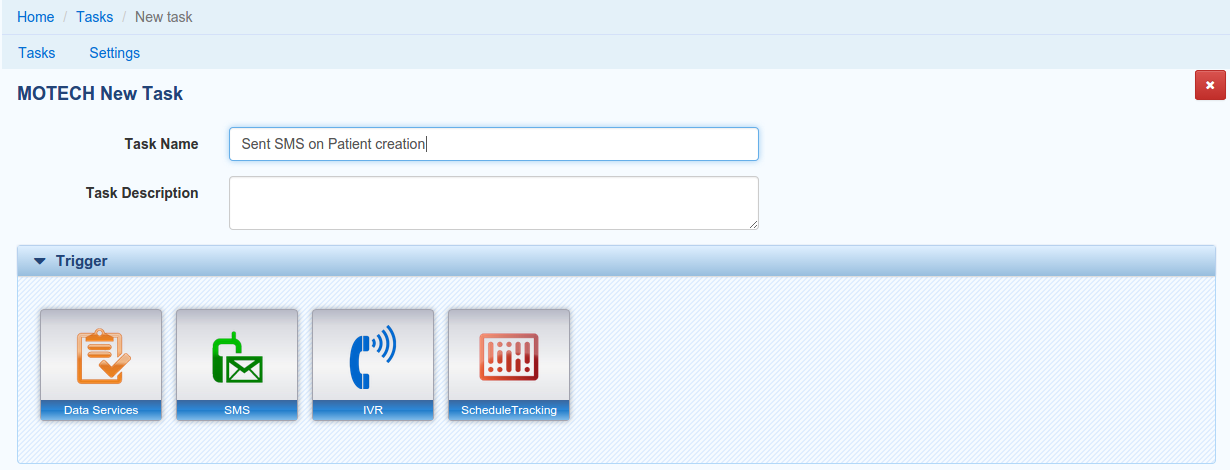
Starting from the top, one can see two properties to provide: task name and task description, from which the task name is mandatory.
Note
In the Tasks UI, if a property has invalid value it is signalled by highlighting its label and input field. There must not be any property with invalid value in order to save the task.
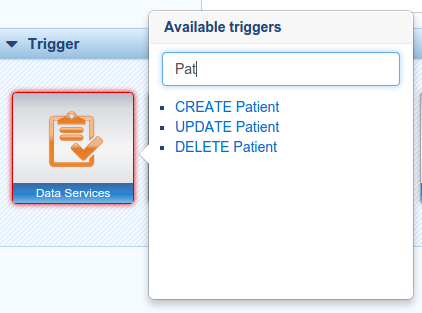
The trigger selection widget comes next. In this example there are four channels registered that expose at least one trigger. Once the channel icon is clicked, a popup shows up. It lists all triggers exposed by that channel.
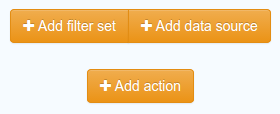
Picking a trigger makes new actions available. One can add a data source, a filter set and finally select an action to execute.
After clicking the ‘Add data source’ button, the data source widget shows up. The first step is to select an actual source. The dropdown lists all registered data sources. After picking one, a data source object must be selected. Now, one has to choose a lookup that will be used to retrieve an object and provide its arguments. In this example the ‘find by id’ lookup is used, thus the only lookup parameter is ID. The argument value may be either entered by hand (hardcoded) or composed from available fields listed on the top of the widget. Additionally, it is possible to set that task execution will fail if the lookup will not find the desired object.
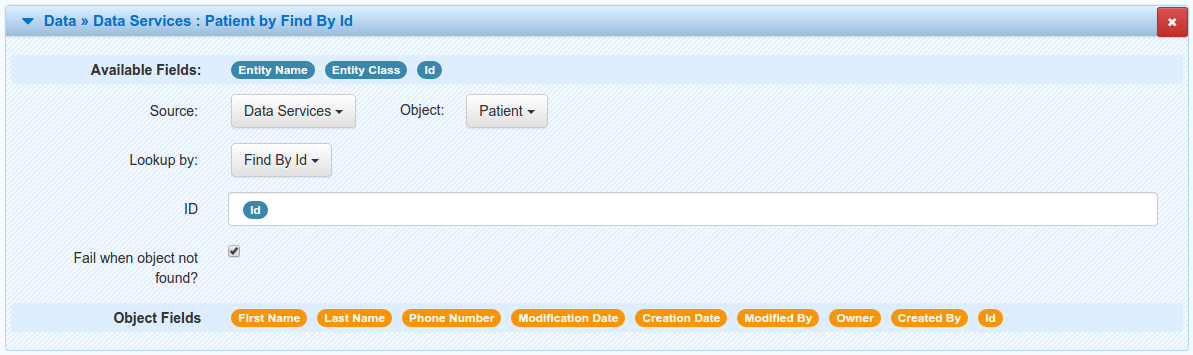
Note
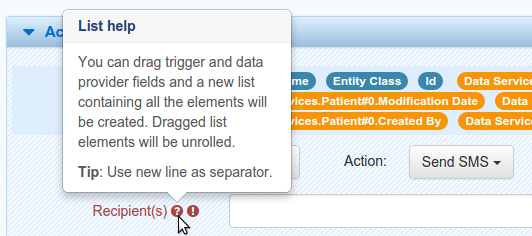
Available fields that may be noticed on the top of the data source and action widgets can be used to compose an argument values for the parameters. To include those fields they may be dragged and dropped into the desired input or written as a token in a text form. The syntax in case of trigger fields (the blue bubbles) is {{trigger.[field_name]}} where field_name is the key of the trigger parameter. In case of data source fields (the orange bubbles) the syntax is {{ad.[data_source_name].[object_name]#[object_index].[field_name]}} where provider_name and object_name corresponds to the selected data source and object respectively, object_index is the index of the object (in a situation when the same object was selected several times in the same task) and field_name corresponds to the object property.
Another available option is to add a filter set. The filter allows to setup a set of conditions that must evaluate to true in order for the task to execute. One can choose if all conditions should be satisfied or just one of them. If the entire condition set is not fulfilled, the task execution is canceled.

Each filter corresponds to a single field, either from trigger or data source. After selecting a field, there is a possibility to manipulate its value using Tasks manipulations by clicking on the gear icon next to it. Then it has to be set if the filter should be satisfied on a condition result or its negation. Finally, the condition can be selected. All conditions are grouped in three categories including Date, Number and String. Each of those contains basic checks that can be performed on the types they represents.
The filter is executed after all previous steps (data source lookups, filters) before were executed. In order for a filter to perform a check on a given data provider object, it has to be placed after that data source step. This can be used to abort the task execution before doing costly data lookups.
At last, with the ‘Add action’ button there comes a possibility to add an action to a task. There can be multiple actions in a single task, but unlike filters and data sources, the task is obligated to contain at least one action to be valid.
Note
If a task contains multiple actions and if some action execution fails, the remaining actions will not be executed.
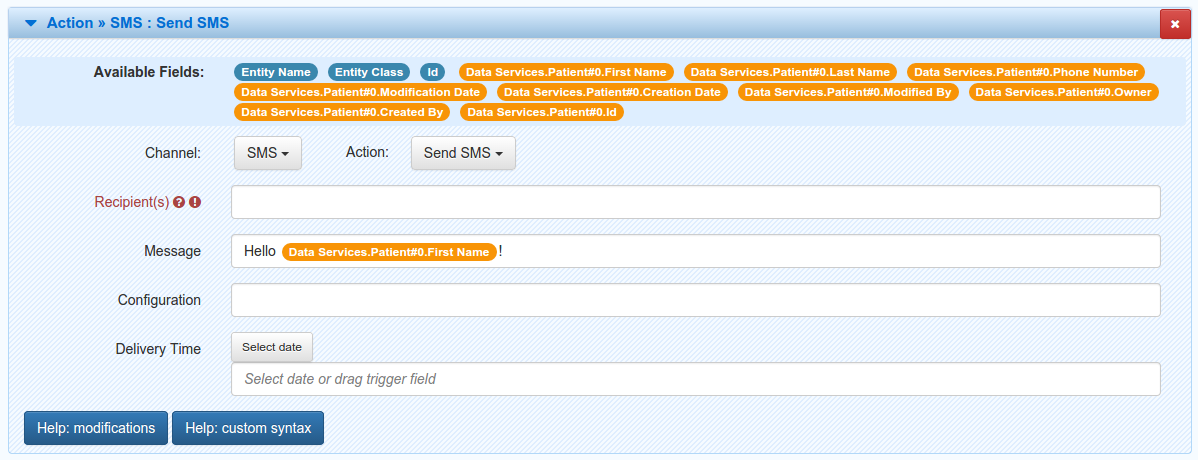
All channels that expose at least one action are listed in the channel dropdown. When one of them is selected, the action dropdown contains all actions available. After selecting both channel and action, a list of action parameters is presented. In order to be valid, the action must not contain any parameter with an invalid value. Like in the case of data source lookups, the parameters may be filled with hardcoded values or combined field available either from the trigger or a data source. In case of fields, its values can be modified using Tasks manipulations. Sometimes, when a property has a complex type, a question mark can be visible next to its label. When hovered over, a popup with a short tooltip is shown.
There are also two buttons at the bottom on the action widget. Once clicked, they provide a handy user manual related with fields syntax and string/date manipulations.
Note
Data sources, filter sets and actions can be removed from task by clicking an ‘X’ button at the top-right corner of the corresponding widget.
Once the task is defined, the last thing to do is to save it. There are two buttons on the bottom that allow to achieve this goal. One of them simply saves the task. This action is possible even if the task is not fully valid. The second option is to save and enable the task at once. In this case, the task must be valid. After clicking any of the buttons, the saved task can be seen in the main view.
Manipulations
In various situations related with task creation, there is a possibility to apply so called manipulations to fields originating from trigger or data sources. Manipulation allow to modify the incoming field values and transform them to something else. The most basic example might be changing all letters of a string value to uppercase.
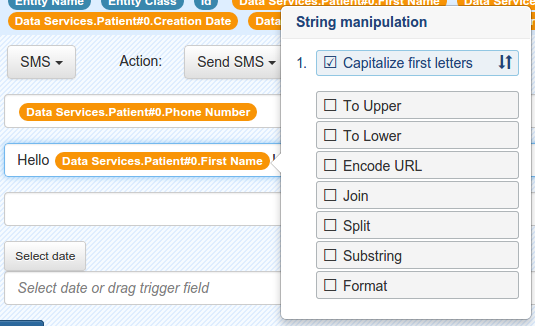
Depending on the field type, distinct manipulations may be enabled. There are currently two categories of supported types: String and Date. An extensive description of them is available at the Tasks UI through a proper help button.
There might be multiple manipulations assigned to a single field. Moreover, they can be ordered in the widget by simply dragging and dropping them.
There is also possibility to define manipulations ‘by hand’ using plain text. The syntax in this case is {{[field]?[manipulation]}}, for example {{trigger.externalId?substring(0,8)?toUpper}}.
Note
Note that the modified value will not be written back to its source. For example, if the firstName field from the Motech Data Services Patient object will be edited with the uppercase manipulation, its value will not be changed in the database.
Managing and monitoring tasks
Once the task is created, it is shown in the main Tasks view in a widget form. In a basic form it contains information about modules related with the task, the task name, an icon indicating if the task is active or not and an icon that leads to a task editing view. Once the task name is clicked, the widget expands to expose all available actions related that task.

The first action allows to edit the task. The editin process is very similar to task creation. The editor view shows up and presents the task in a form in which it was saved. In a situation when a task is invalid, all validation errors are visible at the top of the view.
Second button toggles the task state between paused and active. Active task will be executed when their corresponding trigger will occur, while paused task will not. The task may be paused in order to temporarily disable the task execution.
The delete button allows to permanently delete tasks. Once deleted, a task cannot be restored.
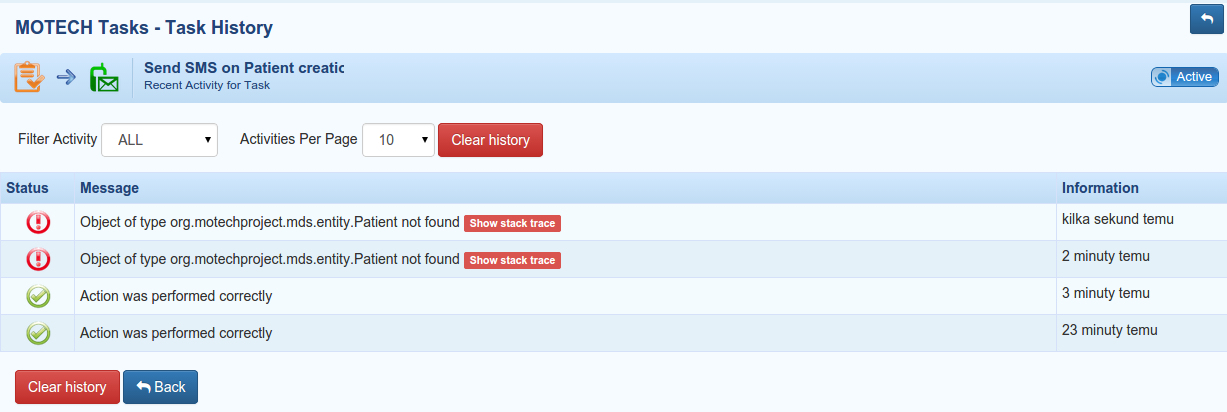
There is also a button that leads to the task history view. It allows to monitor all events related to the task and especially track an execution of the task. It provides information about the task result status and the message, which in case of failure contains stacktrace and failure reason. You can also clean the tasks history.
The last available option is to export the task. Selecting this action will trigger a file download. The file is a json representation of the task, that can be imported using ‘Import task’ action in the main view.
Settings
The only setting actually available is the limit of invalid executions for a single tasks. If the task will fails more times than it is allowed to by this parameter, it will be automatically paused until its manual activation. Once this happens, a message is added to the task events history. If the value of this parameter is set to 0, the task will be paused after only one failure.
It is worth mentioning that this parameter may be also set using file based config. The property name of the parameter is ‘task.possible.errors’.