Demo: SMS-Based Pregnancy Message Campaign
This demo will illustrate how to create an outgoing SMS-based Message Campaign with MOTECH. In order to follow along, you’ll need to have a MOTECH server with the following modules installed:
Further, to send campaign messages via SMS, you need to configure an SMS provider as described in the SMS module documentation.
Defining the Campaign
Our informational message campaign will be aimed at pregnant mothers, and will provide timely information to help women engage in healthy behaviors. The campaign will consist of one message per week, tailored to the specific week of pregnancy. Participants can subscribe to the service at any point in their pregnancies, and when they do, they will start with the message corresponding to current gestational age (i.e. if someone joins the program 20 weeks into her pregnancy, she can start with the message for week 20).
To meet the above requirements, we can use an Offset Campaign (refer to the Message Campaign documentation for a discussion of the different campaign types and how to configure each). The JSON definition of our Offset Campaign will contain 40 messages, one for each week of pregnancy. A snippet of the definition, for the first five weeks, is shown below. You may view the contents of the entire 40-week definition here.
[{
  "name" : "Pregnancy Campaign",
  "type" : "OFFSET",
  "messages" : [
    {
      "name" : "Week 1",
      "formats" : ["SMS"],
      "languages" : ["en"],
      "messageKey": "pregnancy-week-1",
      "timeOffset" : "1 Week",
      "startTime" : "10:30"
    },
    {
      "name" : "Week 2",
      "formats" : ["SMS"],
      "languages" : ["en"],
      "messageKey": "pregnancy-week-2",
      "timeOffset" : "2 Weeks",
      "startTime" : "10:30"
    },
    {
      "name" : "Week 3",
      "formats" : ["SMS"],
      "languages" : ["en"],
      "messageKey": "pregnancy-week-3",
      "timeOffset" : "3 Weeks",
      "startTime" : "10:30"
    },
    {
      "name" : "Week 4",
      "formats" : ["SMS"],
      "languages" : ["en"],
      "messageKey": "pregnancy-week-4",
      "timeOffset" : "4 Weeks",
      "startTime" : "10:30"
    },
    {
      "name" : "Week 5",
      "formats" : ["SMS"],
      "languages" : ["en"],
      "messageKey": "pregnancy-week-5",
      "timeOffset" : "5 Weeks",
      "startTime" : "10:30"
    }
  ]
}]
The campaign JSON may be uploaded using the file upload UI or by placing the message-campaigns.json file in the message-campaign directory. Both methods are described in the Message Campaign documentation.
Creating Campaign Messages
The text content for our SMS messages may be conveniently managed within MOTECH using the CMS Lite module. We’ll define one message for each week of pregnancy, using the “messageKey” specified in our campaign definition as the identifier for each message.
To create a string resource in the CMS, we’ll navigate to the CMS Lite module within the MOTECH UI, and click on the “New Resource” button. A popup will appear, and we can enter our content. Here’s what we might enter for Week 5:
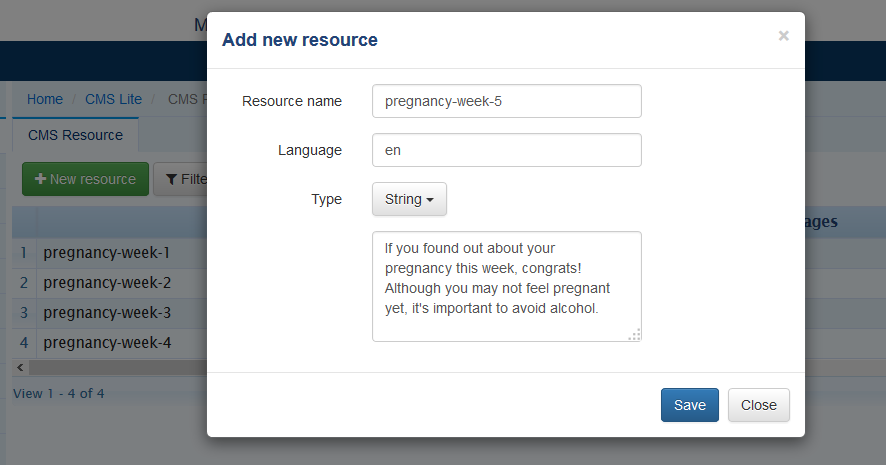
Keep in mind that SMS messages are limited to 140 characters, so we need to keep our prose concise.
Wiring Up Events
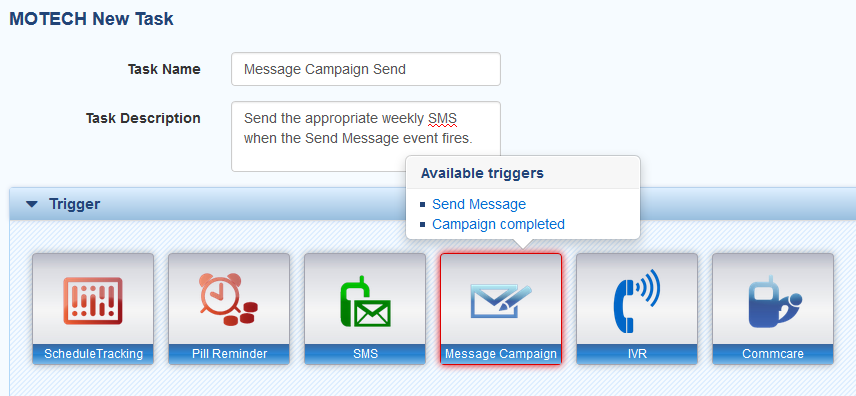
Now that we have a campaign schedule and message content defined, we need to configure MOTECH to send out the appropriate messages according to the schedule. This can be accomplished using the Tasks module.
To get started, we navigate to the Tasks module, and click on “New Task”. For the Trigger, we select Message Campaign’s Send Message event.
Next, we want to ensure that this Task is only executed for our specific message campaign. We can do this by adding a simple Filter to our Task:

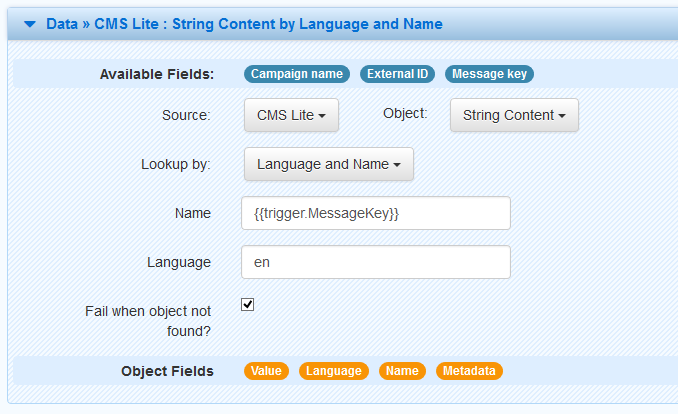
In order to access messages in the CMS, we need to add a Data Source to our Task. We can do this by clicking on “Add Data Source” and selecting “CMS Lite” as the source. Notice that when configuring the data source, the fields contained in the Message Campaign Send Message event are available to be used for lookups in the CMS. These appear as blue ovals and can be dragged/dropped to the input fields below. We want to drag the “Message Key” field and drop it in the CMS Lite “Name” field. Once we’ve configured this data source lookup, the data retrieved from the CMS will be available to the downstream steps in our Task.
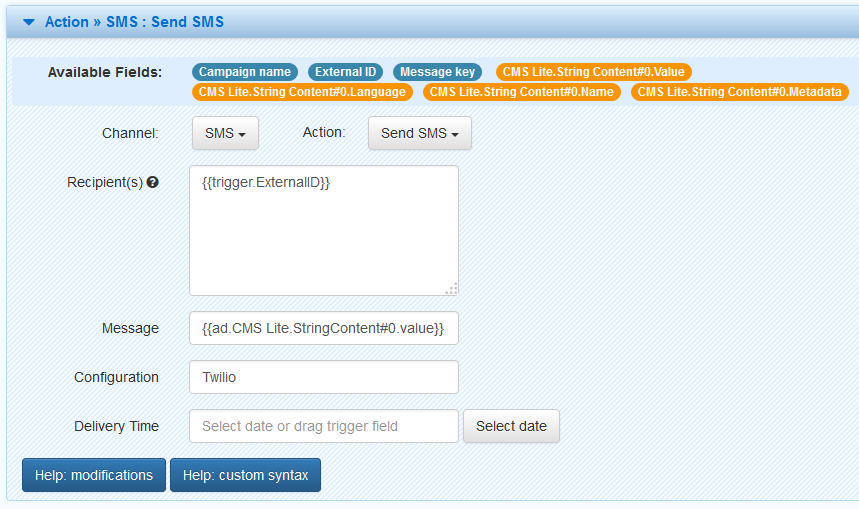
The last step is adding an Action for our Task – this will be where we send the SMS, of course. To construct the Action, first we select the Channel and Action (SMS and Send SMS), and then we can drag/drop the blue and orange ovals (the fields from the Trigger event and our Data Source, respectively) to configure the Action. We drop “External ID” in the recipient field (we haven’t discussed campaign enrollment yet, but this field will hold the recipient’s phone number). Then we can drop the CMS Lite content “value” in the “Message” field. For “Configuration”, we enter the name of the SMS configuration that we want to use to send the message (see the SMS module documentation for instructions on configuring a provider).
And now our Task is complete! Once we click “Save and Enable” it will be active and ready to handle events.
User Enrollment Via SMS
There’s just one more piece of the puzzle – enrolling actual people in the campaign. The Message Campaign documentation describes two standard methods for enrolling subscribers in campaigns: manually using the enrollment UI, or with code. For our campaign, however, it would be nice to allow recipients to self-enroll by sending an SMS. For this, we can use the Tasks module again.
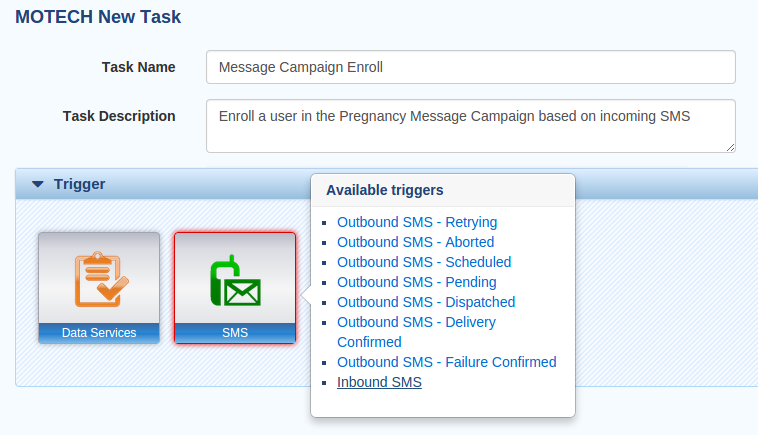
Let’s create a new Task that is triggered by an Incoming SMS, that will create a Message Campaign enrollment corresponding to the information contained in the body of the SMS. For this example, we’ll assume the SMS body is very simple – that it contains the date of the potential enrollee’s last menstrual period (LMP). We’ll use the LMP as the Reference Date for the enrollment in the Message Campaign.
The Trigger part is quite simple:
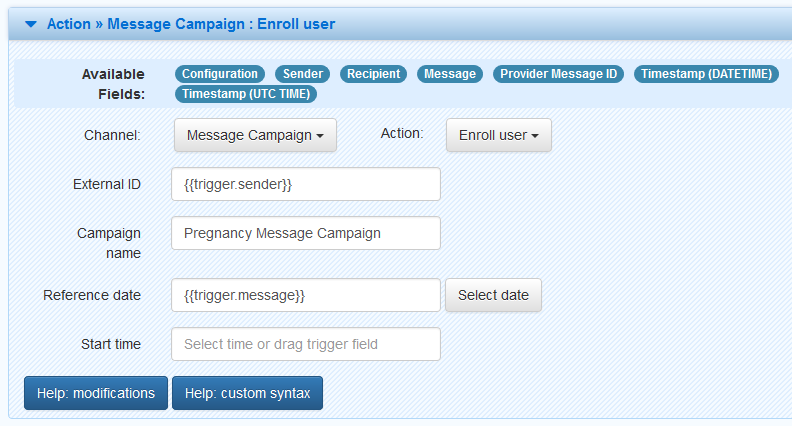
For the Action, we drag the Recipient and Message ovals into the appropriate fields to configure the enrollment:
If desired, we could support additional Message Campaign enrollment actions in response to an inbound SMS – e.g. unsubscribing from a campaign or allowing the user to specify which campaign to subscribe for if our system defines more than one. These variations can also be defined using Tasks, with more sophistication possible if we use filters and/or apply string manipulation functions to the message text in order to parse multi-word messages.