Connecting MOTECH to OpenMRS
Table of Contents
Introduction
MOTECH allows you to integrate with OpenMRS - an open source enterprise electronic medical record system platform. This is done using the OpenMRS-19 module, that communicates with OpenMRS through its REST API and exposes OSGi services which allow your implementation to easily integrate with OpenMRS. Refer to the module documentation for information on using the API it exposes, this document will describe setting up integration between MOTECH and OpenMRS.
You can easily configure the OpenMRS-19 module to integrate with MOTECH, and then use its API to retrieve or manipulate data in OpenMRS. MOTECH uses the REST API exposed by OpenMRS for integration and it will require HTTP access to OpenMRS and an account with rights to the operations you wish to perform.
Take note that the module was written with OpenMRS 1.9 in mind, and we will use that version for reference in this tutorial.
Getting OpenMRS
If you plan on hosting an OpenMRS instance yourself, you can download it from the OpenMRS website. Note that the MOTECH module was created and tested to work with version 1.9. You might encounter problems if choose to use different OpenMRS versions. Use the links below to get OpenMRS:
- OpenMRS website: http://openmrs.org
- OpenMRS 1.9.7 download: http://sourceforge.net/projects/openmrs/files/releases/OpenMRS_1.9.7/
Refer to the OpenMRS documentation for installation instructions: https://wiki.openmrs.org/display/docs/Installing+OpenMRS
Here is the simplest possible route of installing OpenMRS:
- Install Tomcat
- Install MySQL
- In MySQL, create a database called openmrs
- Place the OpenMRS war in the Tomcat webapps directory, making sure its name is openmrs.war
- Start Tomcat
- Go to http://localhost:8080/openmrs
- Follow the installation wizard instructions
Again, refer to OpenMRS documentation for more details.
Configuring the OpenMRS-19 module
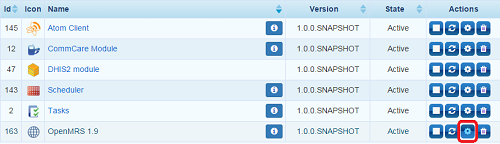
The MOTECH OpenMRS-19 module exposes a configuration file called openmrs.properties. This file is registered with the configuration system. Based on what configuration mode the system is configured with, you can change the settings either by using the Admin UI(UI Mode) or the file in the config file location(File Mode). You can modify this file through the UI by clicking Admin > Manage Modules > Click the gear icon on the right of the OpenMRS module.
The default username and password match the defaults from OpenMRS(make sure that you change these in production environment).
The table below describes the properties declared in the file and their default values, that will work with a default localhost OpenMRS installation. The openmrs.motechIdName setting needs to match an identifier type from OpenMRS. More information on creating the identifier type in OpenMRS can be found in the next section
| Key | Description | Default Value |
|---|---|---|
| openmrs.url | The top level url at which the OpenMRS Instance is accessible. Required since MOTECH integrates with OpenMRS through REST API calls. Using HTTPS in the openmrs.url requires a valid SSL certificate for connection. Otherwise, Java will return an error. For example, running the Bahmni demo with Vagrant automatically redirects all traffic to https regardless of the security certificate (https://192.168.33.10/openmrs). You can get around this by pointing to port 8080 as is done in the default value (http://192.168.33.10:8080/openmrs). | http://localhost:8080/openmrs |
| openmrs.user | The OpenMRS username that MOTECH will use to identify with OpenMRS. | admin |
| openmrs.password | The OpenMRS user password that MOTECH will use to identify with OpenMRS. | Admin123 |
| openmrs.motechIdName | The name of the OpenMRS identifier used by MOTECH. This must match the identifier that you will create in OpenMRS. The default is MOTECH Id, but it could easily be changed to anything. For example, one could choose caseID if storing CommCare caseIDs in OpenMRS. | MOTECH Id |
| openmrs.identifierTypes | By default, we support the one identifier type specified in openmrs.motechIdName property. Define additional identifier types here if you need to create or query an OpenMRS patient with multiple, custom identifiers via MOTECH (comma separated, if more than one). |
Note
The module must be restarted in order for configuration changes to take effect.
Creating a MOTECH Identifier in OpenMRS 1.9
In order to make the module work with OpenMRS, an identifier type that MOTECH will use for identifying patients must be created. The name of that identified must match the value of the configuration variable openmrs.motechIdName. In order to define the ID type, go to the Administration section of OpenMRS, then select Manage Identifier Types under the section Patients:

Next, select Add Patient Identifier Type:

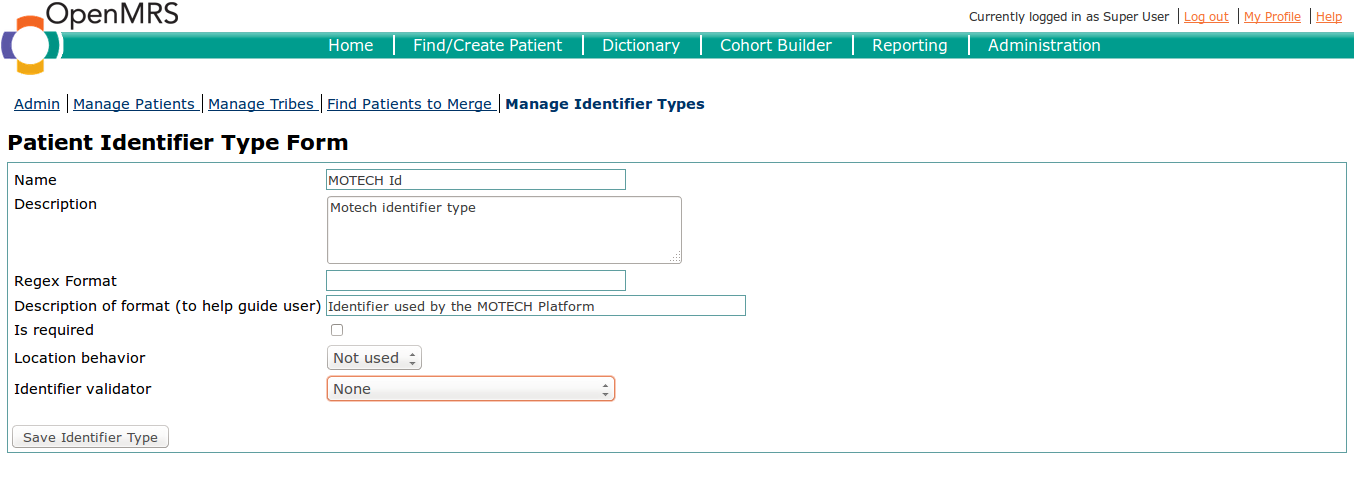
Finally, enter the details of the identifier type. The name must match the one in the openmrs.motechIdName setting variable. You can specify the settings as you wish, note that for example making locations required or adding a regex format for the identifier will restrict what values you can use. Refer to the OpenMRS documentation for more information.
Installing Rest Web Services module in OpenMRS
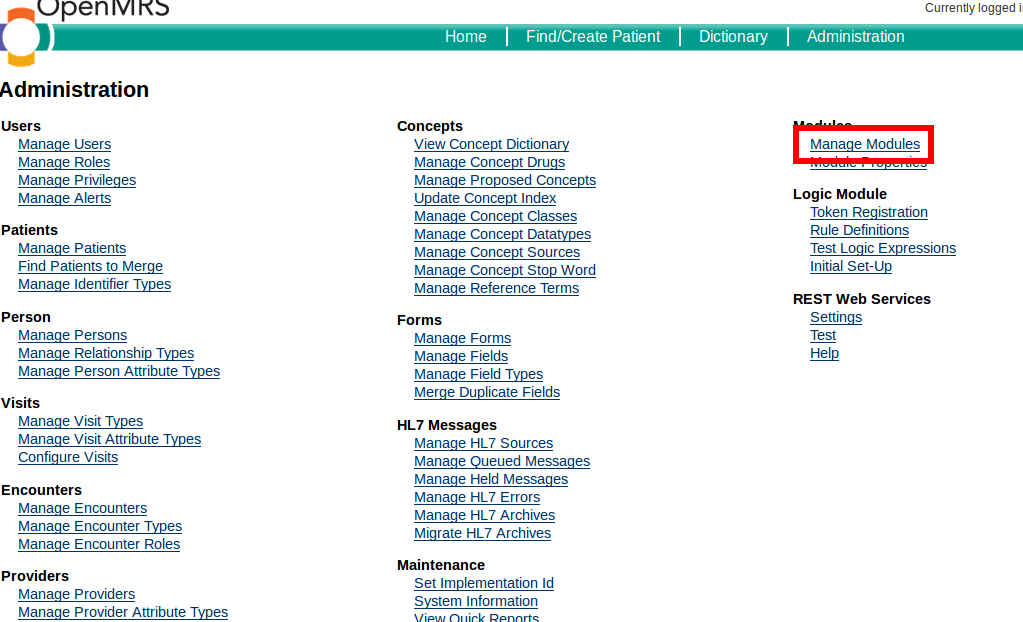
MOTECH communicates with the OpenMRS via REST, which means that the OpenMRS instance must have a Rest Web Services module installed and activated. You can find the required module on the OpenMRS modules website. Pick the latest released version (2.9+) and download it. You can install the module using OpenMRS UI. Go to Administration tab, and select Manage Modules.
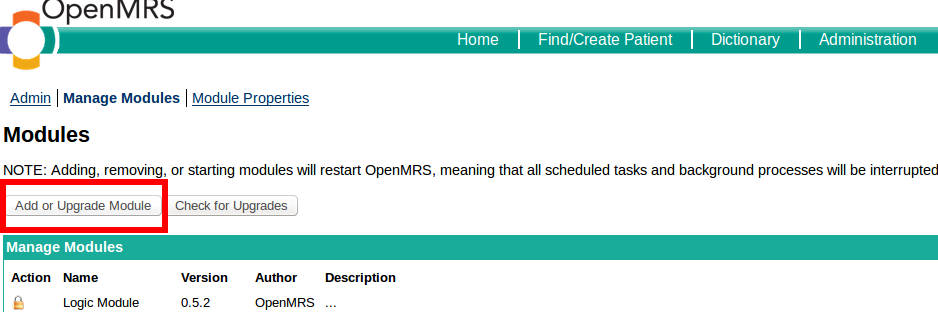
You will see the Add or Upgrade Module button. Click it, then select the downloaded file under “Add module” and upload it. The module will be installed and started. You can verify its status in the Manage Modules section.
You should now be able to use the OpenMRS-19 module. Refer to the module documentation for usage instructions.